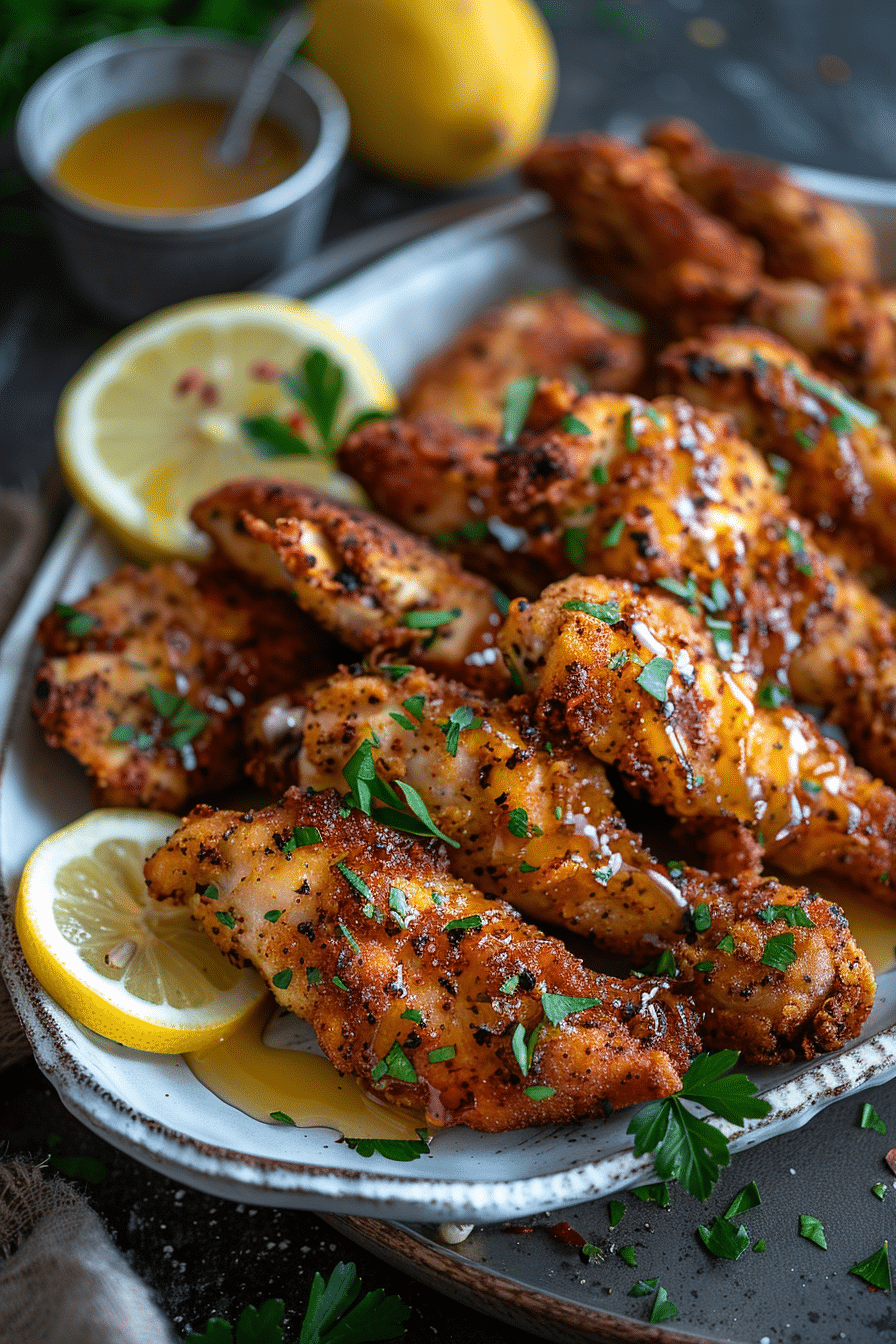
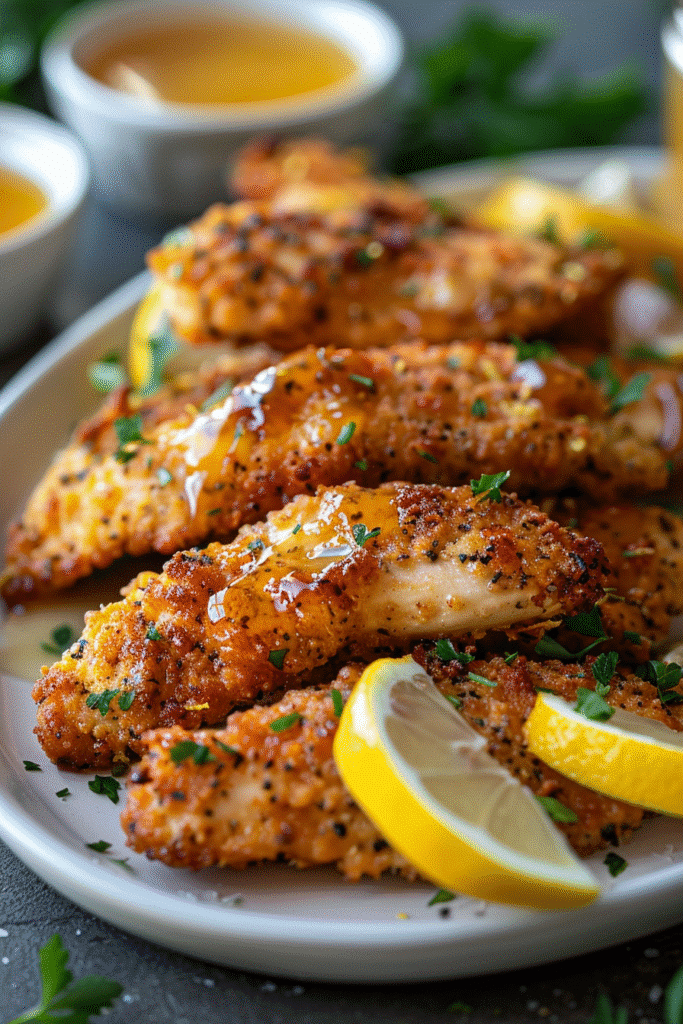
Craving restaurant-quality chicken tenders without leaving your kitchen? These Lemon Pepper Chicken Tenders deliver crispy, golden perfection with a zesty twist that’ll make your taste buds dance! Marinated in buttermilk and coated in perfectly seasoned flour, then finished with a luscious honey butter sauce, this recipe transforms simple ingredients into an unforgettable meal that rivals any takeout option.
Table of Contents
Why You’ll Love This Recipe
These chicken tenders check all the boxes for the perfect weeknight dinner. The buttermilk marinade ensures incredibly juicy, tender chicken while the lemon pepper seasoning adds that irresistible citrusy kick with just the right amount of heat. The honey butter sauce? That’s the secret weapon that takes these tenders from great to absolutely phenomenal.
What makes this recipe truly special is its versatility. Serve them as a main dish with your favorite sides, slice them over salads, tuck them into wraps, or serve them as party appetizers with the honey butter sauce on the side for dipping. Whether you’re feeding picky kids or hosting game day gatherings, these tenders are guaranteed crowd-pleasers.
Key Ingredients Breakdown
Main Components
| Ingredient | Purpose | Pro Tips |
|---|---|---|
| Chicken Tenderloins | Naturally tender, cooks quickly | Can substitute with chicken breast cut into strips |
| Buttermilk | Tenderizes and adds tang | Use full-fat for best results; can substitute with milk + vinegar |
| Lemon Pepper Seasoning | Star flavor profile | Use quality brands for best taste |
| Fresh Lemon | Bright citrus notes | Zest before juicing for maximum efficiency |
| All-Purpose Flour | Creates crispy coating | For gluten-free, use 1:1 gluten-free flour blend |
| Peanut/Vegetable Oil | High smoke point for frying | Must maintain 350-370°F for perfect texture |
Honey Butter Sauce
- Unsalted Butter: Forms the rich base of the sauce
- Pure Honey: Adds natural sweetness that balances the savory elements
- Lemon Zest & Garlic: Amplifies the flavor complexity
- Lemon Pepper Seasoning: Ties everything together beautifully
Step-by-Step Instructions
Marinating Process
- Pat your chicken tenderloins completely dry using paper towels – this helps the marinade adhere better
- Place chicken in a large resealable bag or lidded container
- Combine buttermilk, 1 tablespoon lemon pepper seasoning, lemon zest, lemon juice, hot sauce, 1 teaspoon garlic powder, and 1/2 teaspoon smoked paprika
- Pour marinade over chicken and massage with hands (use gloves if preferred) to ensure every piece is fully coated
- Seal container and refrigerate for at least 3 hours, preferably overnight for maximum flavor penetration
Pro Tip: The longer you marinate, the more tender and flavorful your chicken becomes. Overnight marination is highly recommended!
Preparing the Coating
- In a shallow pie plate, whisk together:
- 1 cup all-purpose flour
- 2 teaspoons lemon pepper seasoning
- 1 teaspoon garlic powder
- 1/2 teaspoon smoked paprika
- Mix thoroughly to ensure even seasoning distribution
- Set aside until ready to dredge
Frying to Perfection
- Heat 2-3 inches of peanut or vegetable oil in a heavy-bottomed pot or Dutch oven over medium-high heat
- Use a deep-fry thermometer to reach and maintain 350-370°F
- While oil heats, dredge each marinated tender in the seasoned flour mixture, coating generously and filling all gaps
- Shake off excess flour and place on a baking sheet
- Let coated chicken rest while oil reaches temperature
- Carefully add 4-5 tenders at a time to avoid overcrowding (which lowers oil temperature)
- Fry for 2-3 minutes until golden brown and internal temperature reaches 165°F
- Transfer to a wire rack-fitted baking sheet or paper towel-lined plate
- Allow oil to return to 350°F between batches
Creating the Honey Butter Sauce
- Melt butter in a small saucepan over medium heat
- Once fully melted, add honey and stir to combine
- Add lemon pepper seasoning, lemon zest, and minced garlic
- Stir well and bring to a slight boil
- Remove from heat immediately
- Toss chicken tenders in sauce or serve on the side for dipping
Expert Tips for Success
Marination Magic
- Minimum 3 hours: This is the bare minimum for decent flavor penetration
- Overnight is best: 8-12 hours allows the buttermilk to fully tenderize the chicken
- Don’t skip the massage: Working the marinade into the chicken ensures even coverage
Oil Temperature Control
- Use a thermometer: Guessing oil temperature leads to greasy or undercooked chicken
- Maintain 350-370°F: Too low = greasy; too high = burnt exterior, raw interior
- Don’t overcrowd: Adding too much chicken drops oil temperature dramatically
- Rest between batches: Let oil come back to temperature for consistent results
Coating Perfection
- Dry chicken slightly: Shake off excess buttermilk before dredging
- Press flour in: Use your hands to really work the flour into crevices
- Let it rest: Resting after coating helps the flour adhere better during frying
Serving Suggestions
- Serve immediately for maximum crispiness
- Pair with coleslaw, mac and cheese, or roasted vegetables
- Great with ranch, blue cheese, or extra honey butter sauce
- Perfect for meal prep – store components separately and reheat in the oven
Nutritional Benefits
While fried food isn’t typically considered “health food,” this recipe has redeeming qualities:
- High protein: Chicken tenderloins are lean protein sources
- Buttermilk: Contains probiotics and calcium
- Lemon: Rich in vitamin C and antioxidants
- Garlic: Offers anti-inflammatory benefits
Healthier Modifications: For a lighter version, bake the coated tenders at 425°F for 20-25 minutes, flipping halfway through, or use an air fryer at 400°F for 12-15 minutes.
Storage and Reheating
Refrigerator: Store leftover chicken tenders in an airtight container for up to 3 days. Keep sauce separate.
Freezing: Freeze fried tenders (without sauce) for up to 2 months. Thaw in refrigerator overnight before reheating.
Reheating: For best results, reheat in a 375°F oven for 10-12 minutes to restore crispiness. Avoid microwaving as it makes the coating soggy.
Frequently Asked Questions
Q: Can I use chicken breasts instead of tenderloins?
A: Absolutely! Cut chicken breasts into 1-inch thick strips. You may need to adjust cooking time slightly depending on thickness.
Q: What if I don’t have buttermilk?
A: Make a substitute by adding 1 tablespoon white vinegar or lemon juice to 1 cup regular milk. Let sit for 5 minutes before using.
Q: Can I make these gluten-free?
A: Yes! Use a 1:1 gluten-free flour blend in place of all-purpose flour. The texture will be nearly identical.
Q: Is there a way to make these without frying?
A: Bake at 425°F for 20-25 minutes, flipping halfway, or air fry at 400°F for 12-15 minutes. They won’t be quite as crispy but still delicious.
Q: Can I prepare these ahead for a party?
A: Marinate and coat the chicken ahead, then fry just before serving. You can also fry them, refrigerate, and reheat in the oven at 375°F for 10 minutes.
Q: How spicy are these?
A: Not very spicy! The teaspoon of hot sauce in the marinade adds flavor complexity, not heat. For spicier tenders, increase hot sauce or add cayenne pepper.
Q: What’s the best oil for frying?
A: Peanut oil is ideal for its high smoke point and neutral flavor. Vegetable, canola, or avocado oil also work well.
Final Thoughts
These Lemon Pepper Chicken Tenders prove that homemade can absolutely beat takeout. The combination of tangy buttermilk marinade, crispy seasoned coating, and that incredible honey butter sauce creates layers of flavor that’ll have everyone asking for seconds. Whether you’re looking for a family-friendly dinner, game day snacks, or impressive party appetizers, this recipe delivers every single time.
Ready to make the best chicken tenders you’ve ever tasted? Gather your ingredients, set aside time for marinating, and prepare for crispy, juicy, absolutely delicious results. Don’t forget to drizzle (or drown!) them in that honey butter sauce – it’s truly the star of the show!
Pin this recipe for your next dinner inspiration and share your results with us! We’d love to see how your Lemon Pepper Chicken Tenders turn out. Happy cooking!
PrintCrispy Lemon Pepper Chicken Tenders with Honey Butter Sauce
Crispy, golden Lemon Pepper Chicken Tenders marinated in buttermilk with zesty lemon and aromatic spices, fried to perfection, and drizzled with a luxurious honey butter sauce. Restaurant-quality flavor at home!
- Prep Time: 3 hours 15 minutes
- Cook Time: 15 minutes
- Total Time: 3 hours 30 minutes
- Yield: 6 servings
- Category: Main Course
- Method: Frying
- Cuisine: American
Ingredients
2 lbs chicken tenderloins (about 14 tenders)
1 cup whole buttermilk
1 tablespoon + 2 teaspoons lemon pepper seasoning, divided
1 tablespoon lemon zest
1 tablespoon freshly squeezed lemon juice
1 teaspoon hot sauce
2 teaspoons garlic powder, divided
1 teaspoon smoked paprika, divided
1 cup all-purpose flour
Peanut or vegetable oil, for frying
For the honey butter sauce:
8 tablespoons (1 stick) unsalted butter, cut into cubes
1/2 cup pure honey
1 1/2 teaspoons lemon pepper seasoning
1 tablespoon lemon zest
1 heaping teaspoon minced garlic
Instructions
1. Pat the chicken dry with paper towels. Place the tenders in a large resealable plastic bag or container. Cover with buttermilk, 1 tablespoon lemon pepper seasoning, lemon zest, lemon juice, hot sauce, 1 teaspoon garlic powder, and 1/2 teaspoon smoked paprika.
2. Massage everything together with your hands, making sure all chicken is fully coated. Seal and refrigerate for at least 3 hours or overnight for best results.
3. In a shallow pie plate, combine the remaining 2 teaspoons lemon pepper seasoning, 1 teaspoon garlic powder, 1/2 teaspoon smoked paprika, and flour. Whisk to combine thoroughly.
4. In a large heavy-bottomed pot or Dutch oven, heat oil over medium-high heat to 350-370°F. Use a deep fry thermometer for precision.
5. Take chicken from buttermilk brine, shake off excess, and coat in seasoned flour mixture. Generously coat all surfaces, filling gaps and crevices. Shake off excess and place on a baking sheet. Repeat with all tenders.
6. Allow coated chicken to rest on baking sheet while oil heats.
7. Once temperature is reached, carefully add 4-5 chicken tenders to avoid overcrowding. Fry until golden brown and crispy, about 2-3 minutes or until internal temperature reaches 165°F. Transfer to a wire rack.
8. Repeat with remaining chicken, ensuring oil returns to 350°F between batches. Let tenders rest while preparing sauce.
9. To make honey butter sauce: Melt butter in a small saucepan over medium heat. Add honey, lemon pepper seasoning, lemon zest, and minced garlic. Stir well and bring to a slight boil, then remove from heat.
10. Place chicken tenders in a large bowl and pour honey butter sauce over them. Toss to coat, or serve sauce on the side for dipping. Serve immediately and enjoy!
Notes
For gluten-free: Use a 1:1 gluten-free flour blend
For baking: Bake coated tenders at 425°F for 20-25 minutes, flipping halfway
For air frying: Cook at 400°F for 12-15 minutes
Marinating overnight produces the most tender, flavorful results
Maintain oil temperature between batches for consistent crispiness
Store leftovers in an airtight container for up to 3 days