Table of Contents
Baking is an invitation to create joy, memories, and magic right in your kitchen. The Chocolate Graveyard Cake embodies this perfectly a rich, lush chocolate cake layered with velvety buttercream and hauntingly delightful decorations. It’s a celebration of flavor and creativity, especially perfect for the Halloween season or any occasion where you want your dessert to tell a story. This cake invites you to immerse yourself in fun, combining delicious chocolate with playful tombstones, green grass, and creepy critters that bring a thrilling atmosphere to your table.
PrintChocolate Graveyard Cake: A Spooky Delight for Your Sweet Tooth

A spooky and delicious Chocolate Graveyard Cake perfect for Halloween or themed parties, decorated with biscuit graves, green buttercream grass, and chocolate details.
- Prep Time: 20 mins
- Cook Time: 30 mins
- Total Time: 50 mins
- Yield: 12 servings
- Category: Dessert
- Method: Baking
- Cuisine: American
- Diet: Vegetarian
Ingredients
225 g Unsalted butter or baking spread, softened
225 g Light brown soft sugar
4 Large eggs
1 tsp Vanilla extract
75 ml Milk
175 g Self-raising flour
50 g Cocoa powder
¼ tsp Baking powder
¼ tsp Bicarbonate of soda
200 g Unsalted butter, softened (buttercream)
325 g Icing sugar (buttercream)
75 g Cocoa powder (buttercream)
3 tbsp Milk (buttercream)
25 g Unsalted butter, softened (green buttercream)
50 g Icing sugar (green buttercream)
⅛ tsp Vanilla extract (green buttercream)
¼ tsp Milk (green buttercream)
Green food colouring
125 g Dark chocolate, melted
8 Biscoff biscuits
25 g White candy melts or white chocolate
200 g Chocolate fingers
120 g Oreos, crushed into crumbs
Jelly snakes (optional)
Fondant pumpkins (optional)
Instructions
1. Preheat oven to 160C Fan/180C/350F/Gas Mark 4. Grease and line a 12″ x 9″ tin.
2. Cream butter and brown sugar until fluffy.
3. Add eggs, milk, and vanilla; mix well.
4. Fold in flour, cocoa, baking powder, and bicarbonate of soda.
5. Pour into tin and bake for 25-30 minutes; cool fully.
6. Break biscuits for graves, dip in dark chocolate, set on paper.
7. Pipe designs with melted white candy melts; let set.
8. Make chocolate buttercream; spread all over cake.
9. Attach chocolate fingers to sides; cover top with Oreo crumbs.
10. Cut slits for biscuit graves; insert carefully.
11. Add jelly snakes and fondant pumpkins if desired.
12. Prepare green buttercream grass; pipe around graves.
13. Serve sliced; store leftovers in airtight container for 3 days.
Notes
Use room temperature ingredients for best results.
Allow cake to cool before decorating.
Customize decorations to your liking.
Consume within 3 days.
Ingredients for Your Chocolate Graveyard Cake
Gathering your ingredients right sets the stage for success. Here’s a comprehensive list for both the cake and the decorative elements:
Cake Ingredients
| Ingredient | Amount | Notes |
|---|---|---|
| Unsalted butter or baking spread | 225 g | softened |
| Light brown soft sugar | 225 g | |
| Large eggs | 4 | |
| Vanilla extract | 1 tsp | |
| Milk | 75 ml | |
| Self-raising flour | 175 g | |
| Cocoa powder | 50 g | |
| Baking powder | ¼ tsp | |
| Bicarbonate of soda | ¼ tsp |
Chocolate Buttercream Ingredients
| Ingredient | Amount | Notes |
|---|---|---|
| Unsalted butter | 200 g | softened |
| Icing sugar | 325 g | |
| Cocoa powder | 75 g | |
| Milk | 3 tbsp |
Green Buttercream Ingredients (for “grass”)
| Ingredient | Amount | Notes |
|---|---|---|
| Unsalted butter | 25 g | softened |
| Icing sugar | 50 g | |
| Vanilla extract | ⅛ tsp | |
| Milk | ¼ tsp | |
| Green food colouring | as needed |
Decoration Ingredients
- 125 g dark chocolate (melted)
- 8 Biscoff biscuits
- 25 g white candy melts or white chocolate
- 200 g chocolate fingers
- 120 g Oreos, crushed into crumbs
- Jelly snakes (optional for spooky fun)
- Fondant pumpkins (optional, adds a festive touch)
Preparing Your Chocolate Graveyard Cake
Step 1: Preheat and Prepare the Baking Tin
Begin by preheating your oven to 160C fan (180C conventional/350F). Grease and line a 12″x9″ traybake tin to ensure your cake releases easily after baking.
Step 2: Make the Cake Batter
- Cream the softened butter and brown sugar together using an electric mixer until light and fluffy (about 2-3 minutes). This step aerates the mixture, ensuring a soft crumb.
- Beat in the eggs, milk, and vanilla extract until fully combined for a smooth texture.
- Gently fold in the self-raising flour, cocoa powder, baking powder, and bicarbonate of soda to retain the air and make the cake rise beautifully.
Step 3: Bake to Perfection
Pour the batter evenly into your prepared tin, smoothing the surface with a spatula. Bake in the preheated oven for 25-30 minutes. Test readiness by inserting a skewer in the center it should come out clean. Once baked, allow the cake to cool fully on a rack or in the tin.
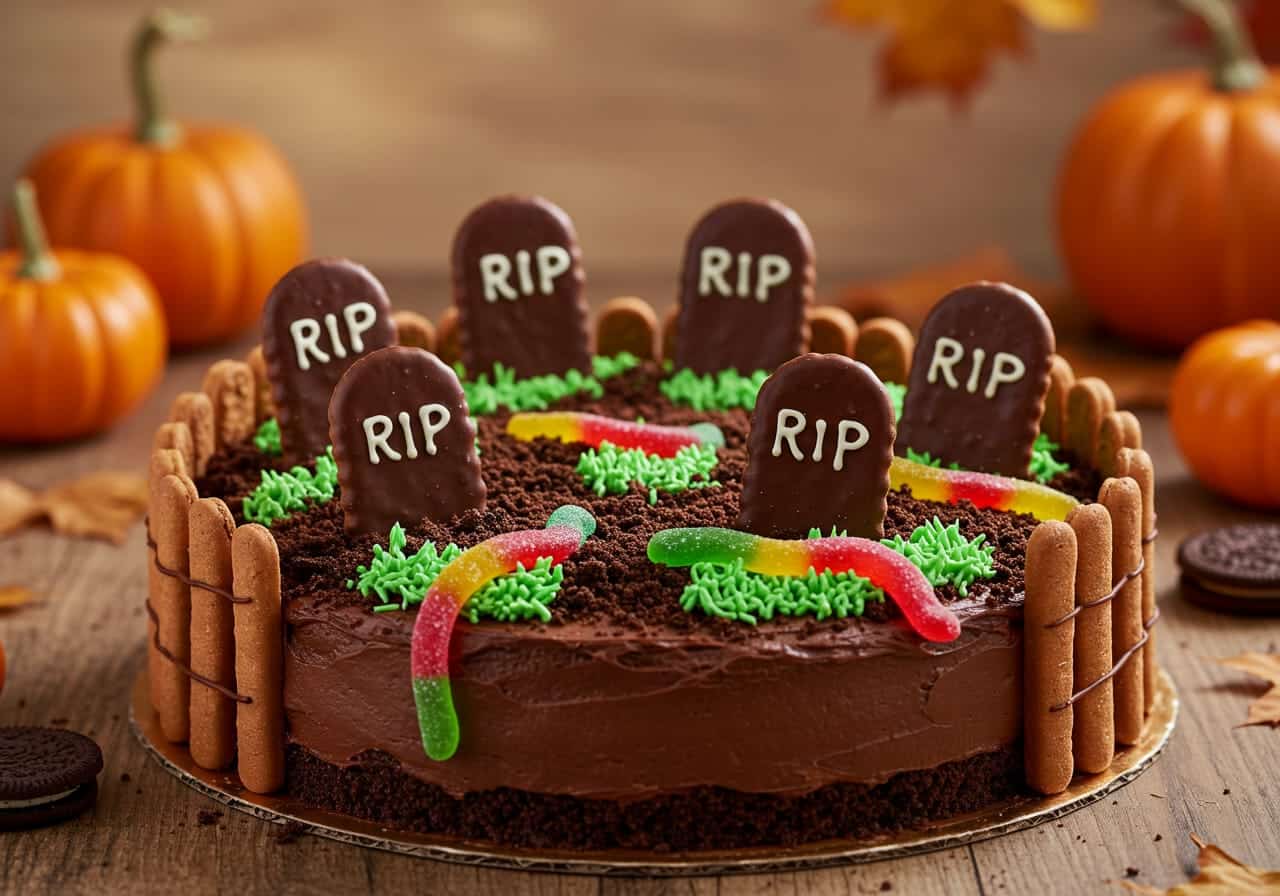
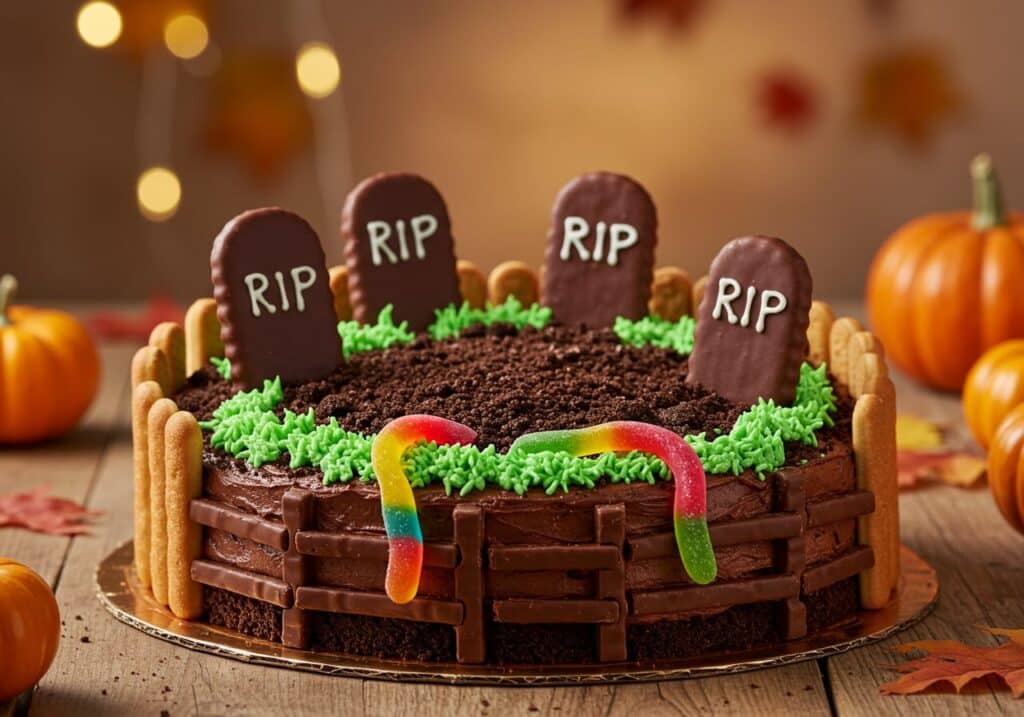
Creating the Haunted Graveyard Decoration
Making Biscuit Tombstones
While the cake cools, time to craft your gravestones:
- Break about one-third off each Biscoff biscuit to create smaller tombstone-sized pieces.
- Melt the dark chocolate and dip each biscuit in it, shaking off excess chocolate gently, then place on baking paper to set.
- Once hardened, melt the white candy melts and pipe spooky inscriptions or designs on the tombstones using a small piping bag tip. Let them set fully.
Preparing the Chocolate Buttercream
- Beat the softened butter until creamy.
- Gradually add icing sugar, cocoa powder, and milk, mixing until you achieve a smooth, spreadable consistency.
- Adjust milk if the buttercream is too thick for easy spreading.
Assemble Your Graveyard Cake
- Spread the chocolate buttercream evenly over the cooled cake, covering all surfaces using an angled palette knife for a smooth finish.
- Break the chocolate fingers into various lengths and stick them upright around the cake’s edge like a rustic fence, pushing gently so they adhere to the buttercream.
- Sprinkle crushed Oreo crumbs over the cake surface to resemble freshly turned earth.
Position Your Biscuit Graves and Add Creepy Crawlers
- Cut small slits into the cake surface where you want the biscuits (tombstones).
- Push the biscuit graves gently into these slits, standing them upright.
- Decorate the cake with jelly snakes or fondant pumpkins to enhance the spooky graveyard vibe.
Crafting the Realistic Grass
- Mix green buttercream butter, icing sugar, vanilla, milk, and green food coloring until smooth.
- Using a piping bag fitted with a grass nozzle, pipe the green buttercream “grass” around the tombstones and at random spots on the cake. Alternatively, spoon small blobs and flick with the back of the spoon for textured grass.
Tips and Tricks for Best Results
- For a tender crumb, always use room temperature butter and eggs.
- Ensure the cake has cooled completely before applying any buttercream to prevent melting.
- Customize your graveyard accessories based on what you have at hand or the level of spookiness you want.
- Store any leftovers in an airtight container in a cool place and enjoy within three days for optimal freshness.
Nutritional Overview (Per Slice Estimate)
| Nutrient | Amount |
|---|---|
| Calories | 420 kcal |
| Total Fat | 27 g |
| Saturated Fat | 15 g |
| Unsaturated Fat | 10 g |
| Trans Fat | 0.2 g |
| Cholesterol | 85 mg |
| Sodium | 150 mg |
| Total Carbohydrate | 45 g |
| Fiber | 3 g |
| Sugars | 32 g |
| Protein | 5 g |
Conclusion: Bake Your Own Spooky Masterpiece
The Chocolate Graveyard Cake is a perfect blend of imagination and indulgence. Each slice delivers rich chocolate flavor, creamy buttercream, and textured fun that will captivate both kids and adults alike. Baking this cake will turn your kitchen into a place of festive creativity and your table into a spooky ground perfect for celebrations. So, gather your ingredients, get decorating, and enjoy the eerie delight of this gorgeous Halloween centerpiece!