Table of Contents
Table of Contents
Difficulty Level: ⭐⭐ Easy
Introduction: The Magic of Zebra Cake
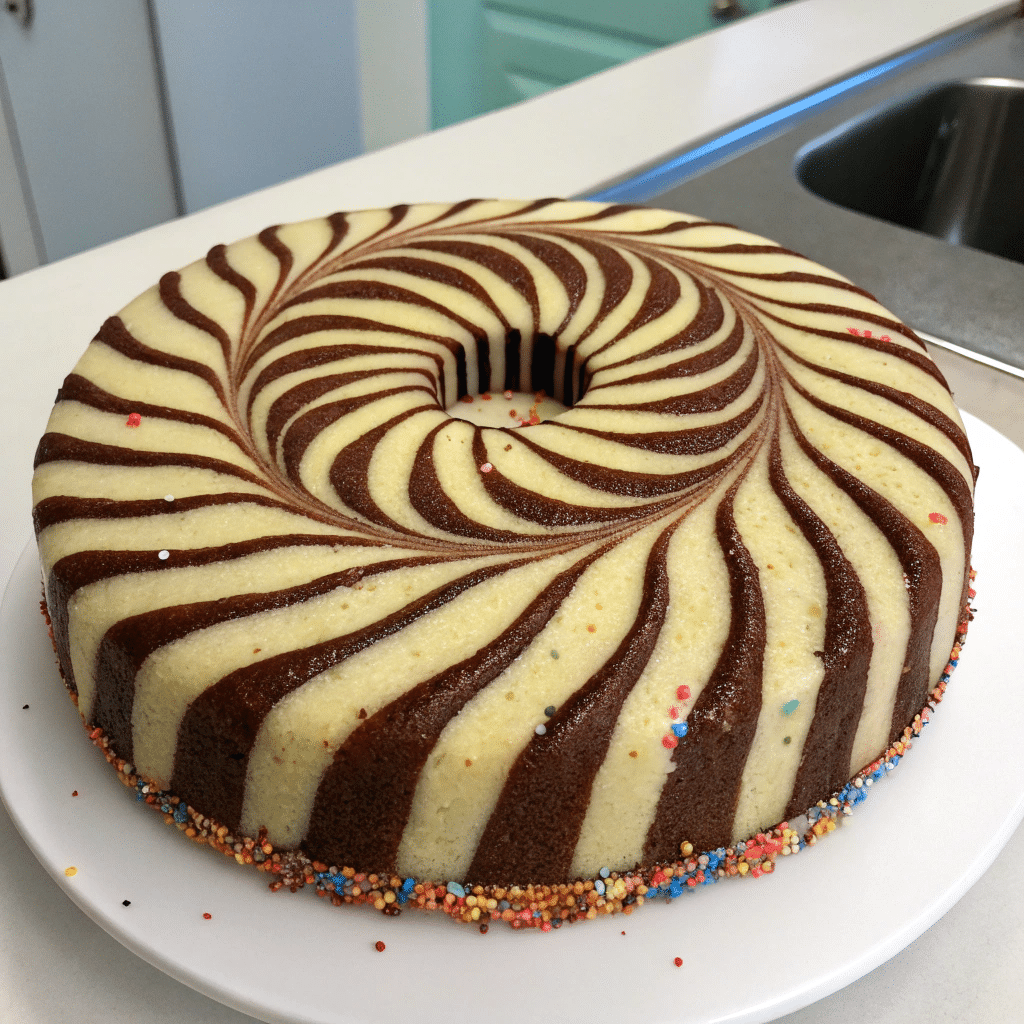
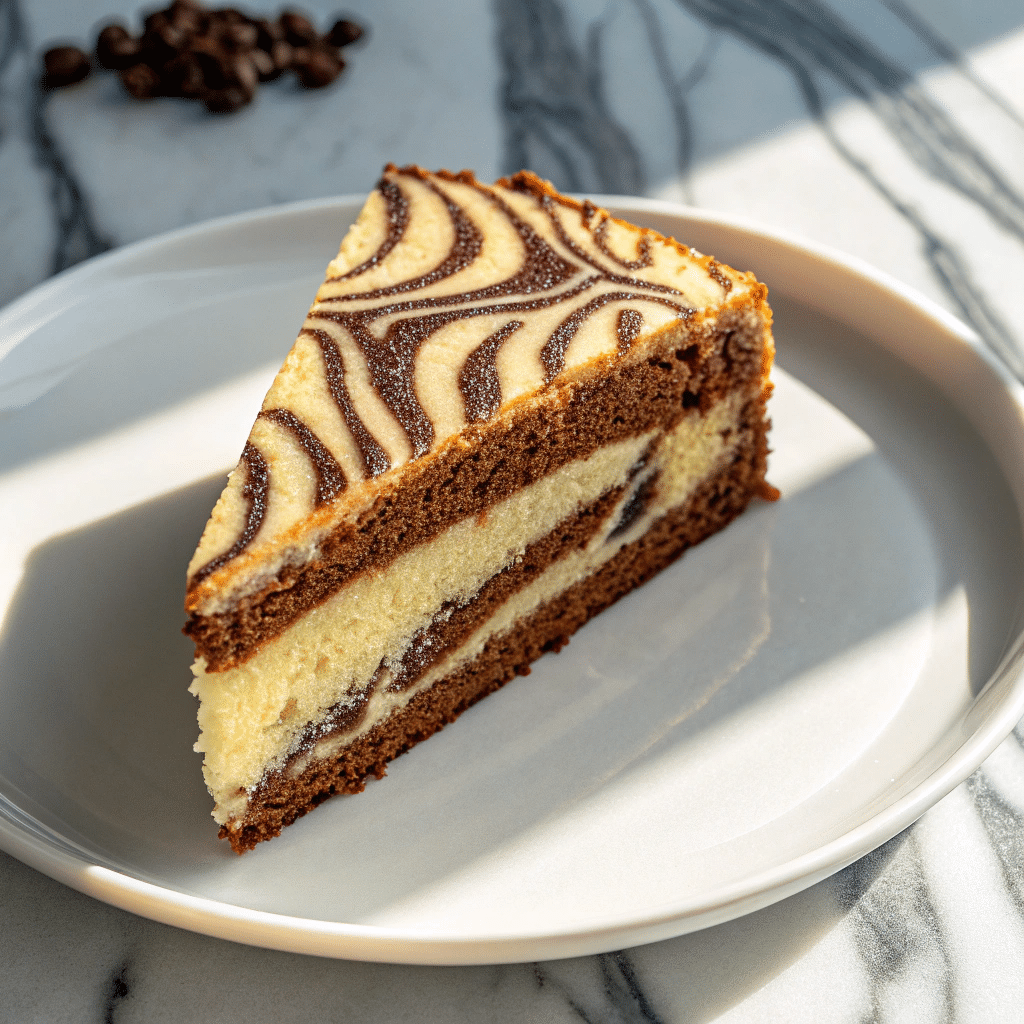
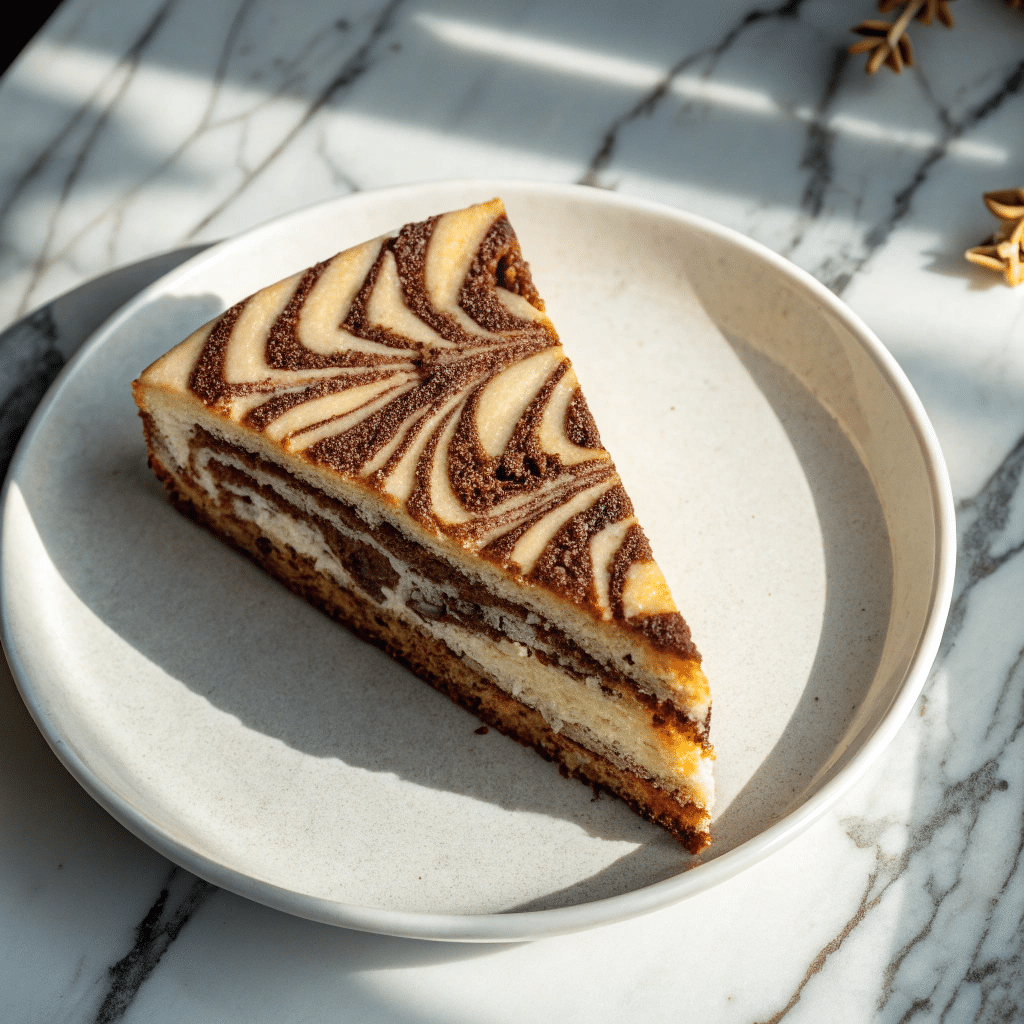
There’s something utterly captivating about slicing into a zebra cake and revealing those mesmerizing stripes that swirl throughout each piece. Despite its impressive appearance, this zebra cake is surprisingly simple to create, requiring no special equipment or advanced baking skills. The beauty lies in the striking contrast between rich chocolate and delicate vanilla batters that create a visual masterpiece reminiscent of zebra stripes. When you take that first bite, you’ll experience the perfect harmony of two classic flavors – the sweet, aromatic vanilla complementing the deep, slightly bitter notes of chocolate. The texture is incredibly moist and tender, with a light, airy crumb that practically melts in your mouth.
What makes zebra cake truly special is how it transforms a simple afternoon coffee break into something memorable. Still warm from the oven and paired with a cold glass of milk, this cake evokes childhood nostalgia while still feeling sophisticated enough for any occasion.
The batter itself is so creamy and delicious that you might be tempted to sample it before it even reaches the oven! Whether you’re serving it plain for a casual family dessert or dressing it up with a glossy chocolate glaze for a more elegant presentation, zebra cake never fails to impress both in appearance and taste. The visual drama of those perfect stripes belies how effortless this cake is to prepare – it’s all in the simple technique of alternating spoonfuls of batter to create that stunning zebra pattern that will have everyone asking for your secret.
PrintZebra Cake: 10 Stunning Patterns to Unleash Your Baking Joy

Discover the art of baking with this Zebra Cake recipe featuring 10 stunning patterns that will bring joy and creativity to your kitchen. This moist and flavorful cake combines classic vanilla and chocolate batters to create a beautiful striped effect that’s as delightful to look at as it is to eat.
- Prep Time: PT20M
- Cook Time: PT45M
- Total Time: PT1h5M
- Yield: 12 servings
- Category: Dessert
- Method: Bake
- Cuisine: International
Ingredients
2 cups all-purpose flour
1 1/2 teaspoons baking powder
1/4 teaspoon salt
1 cup unsalted butter, softened
1 1/4 cups granulated sugar
4 large eggs
1 teaspoon vanilla extract
1 cup whole milk
1/4 cup unsweetened cocoa powder
1/4 cup boiling water
Instructions
Preheat your oven to 350°F (175°C). Grease and flour a 9-inch round cake pan.
In a medium bowl, whisk together flour, baking powder, and salt.
In a large bowl, cream the butter and sugar until light and fluffy.
Add eggs one at a time, beating well after each addition. Stir in vanilla extract.
Alternately add the flour mixture and milk to the butter mixture, beginning and ending with flour mixture. Mix until just combined.
Divide the batter into two equal parts. In one part, mix the cocoa powder and boiling water until smooth.
To create the zebra pattern, spoon 2 tablespoons of vanilla batter into the center of the pan, then spoon 2 tablespoons of chocolate batter directly on top. Continue alternating batters in the center until all batter is used.
Bake for 40-45 minutes or until a toothpick inserted into the center comes out clean.
Allow the cake to cool in the pan for 10 minutes, then turn out onto a wire rack to cool completely.
Slice and enjoy your beautifully patterned zebra cake!
Notes
For more stunning patterns, try varying the amount of batter you spoon in each layer or use different colors of batter. This cake is perfect for celebrations and will impress your guests.
The Rich History of Zebra Cake
The zebra cake, also known as marble cake or “Marmorkuchen” in German, has a fascinating history that dates back to early nineteenth-century Germany. The name “Marmor” is the German word for marble, referring to the cake’s distinctive streaked or mottled appearance. Interestingly, the earliest versions of marble cake were quite different from what we know today. The original marble cake was actually a variation of a kugelhopf (a sweet yeast bread), where one half of the dough was colored with molasses and spices to create a dark batter that contrasted with the lighter portion.
As baking techniques evolved, German bakers began applying the same marbling concept to sponge cake batters, creating the foundation for the zebra cake we recognize today. The cake made its way to America shortly before the Civil War, with the term “marble cake” first appearing in English in the September 29, 1859 issue of the Illinois State Chronicle. During the Victorian era, a popular variation called “Harlequin cake” featured a more structured checkerboard pattern rather than the free-flowing marbled design.
The introduction of chocolate as the darkening agent in the Rhein-Ruhr area during the twentieth century transformed marble cake into the chocolate-vanilla version that has become standard across Germany, Austria, and eventually worldwide. While the cake has evolved over time, its appeal remains constant – the striking visual pattern combined with complementary flavors creates a dessert that’s both beautiful and delicious. Today, zebra cake continues to be a beloved treat that bridges cultures and generations, appearing in bakeries and home kitchens around the world, each with their own slight variations but all sharing that distinctive striped pattern that gives the cake its zebra-inspired name.
Full Ingredient List
Creating the perfect zebra cake requires quality ingredients that work together to achieve those stunning stripes and delicious flavor. Here’s everything you’ll need:
For the Vanilla Batter:
- 3½ cups (413g) sifted all-purpose flour
- 1 teaspoon salt (kosher salt preferred)
- 2 teaspoons baking powder
- ¾ teaspoon baking soda
- 1½ cups (340g) unsalted butter, softened to room temperature
- 2 cups (400g) granulated sugar
- 5 large eggs, at room temperature
- ⅓ cup (75g) sour cream, at room temperature
- 1 tablespoon pure vanilla extract (use high-quality for best flavor)
- 1¾ cups (420ml) buttermilk, at room temperature
For the Chocolate Batter:
- ⅓ cup (27g) unsweetened natural cocoa powder (Dutch-processed works too)
- 2 tablespoons granulated sugar
- 2 tablespoons milk or buttermilk, at room temperature
- 1 teaspoon espresso powder (optional, but enhances chocolate flavor)
For the Chocolate Cream Cheese Frosting:
- 12 ounces (339g) full-fat brick cream cheese, softened to room temperature
- ¾ cup (170g) unsalted butter, softened to room temperature
- 3½ cups (420g) confectioners’ sugar
- ⅔ cup (55g) unsweetened cocoa powder (Dutch-processed for darker color)
- 1 teaspoon pure vanilla extract
- 1-2 tablespoons milk or heavy cream
- Pinch of salt
- Sprinkles for decorating (optional)
Possible Substitutions:
- Buttermilk can be replaced with whole milk mixed with 1 tablespoon vinegar or lemon juice
- Sour cream can be substituted with full-fat Greek yogurt
- For a dairy-free version, use plant-based milk and vegan butter alternatives
- All-purpose flour can be replaced with a 1:1 gluten-free flour blend for a gluten-free option
Time Breakdown
Understanding the timing helps you plan your baking schedule effectively:
Total Time: 4 hours 15 minutes
Prep Time: 20-30 minutes (measuring ingredients and preparing batters)
Baking Time: 45-60 minutes (depending on your oven)
Cooling Time: 3 hours (minimum before frosting)
Decorating Time: 20-30 minutes
Additional Timing Notes:
- Allow all refrigerated ingredients to come to room temperature (about 1 hour) before beginning
- The cake layers can be baked a day ahead and stored wrapped in plastic wrap at room temperature
- Frosting can be made up to 3 days ahead and refrigerated in an airtight container
- Fully frosted cake will stay fresh in the refrigerator for up to 5 days
Required Kitchen Equipment
Having the right tools on hand makes creating this stunning zebra cake much easier:
Essential Tools:
- Two 8-inch round cake pans (9-inch will work but produce thinner layers)
- Parchment paper for lining pans
- Electric mixer (stand mixer preferred, but hand mixer works too)
- Large mixing bowls (at least 3 – two for batters, one for frosting)
- Measuring cups and spoons (both dry and liquid measures)
- Digital kitchen scale for precise measurements
- Rubber spatulas for folding and scraping
- Whisk for combining dry ingredients
- Tablespoon for alternating batters
- Cooling rack
- Cake turntable (highly recommended for frosting)
- Offset spatula for spreading frosting
- Bench scraper for smoothing frosting sides
- Cake board or serving plate
- Toothpicks or cake tester for checking doneness
- Sifter or fine-mesh strainer for cocoa powder and confectioners’ sugar
Alternatives and Workarounds:
- No stand mixer? A hand mixer works fine, just expect more arm workout
- No cake turntable? Use a flat plate that can rotate easily
- No offset spatula? A butter knife can work in a pinch
- No bench scraper? A large, straight-edged spatula can substitute
- No parchment paper? Thoroughly grease and flour the pans
- No cake pans? A 9×13-inch pan works (baking time will differ)
- No sifter? Use a fine-mesh strainer or whisk vigorously to remove lumps
Having these tools ready before you begin will streamline the baking process and help ensure your zebra cake turns out beautifully striped and perfectly textured.
Step-by-Step Preparation
Creating those mesmerizing zebra stripes is easier than you might think! Follow these precise steps to achieve perfect results every time:
- Preheat your oven to 350°F (180°C). Grease two 8-inch round cake pans with cooking spray or butter, then line the bottoms with parchment paper circles for easy removal.
- Prepare the dry ingredients by whisking together the flour, baking powder, salt, and baking soda in a large bowl until well combined. Set aside.
- Cream the butter and sugar in the bowl of your stand mixer fitted with the paddle attachment. Beat on medium speed for 3-4 minutes until the mixture becomes light and fluffy. You’ll notice the color lighten significantly when properly creamed.
- Add eggs one at a time, beating for 30 seconds after each addition. Scrape down the sides of the bowl with a rubber spatula to ensure everything is incorporated evenly.
- Mix in the sour cream and vanilla extract until just combined. The mixture should look smooth and creamy at this point.
- Begin alternating dry and wet ingredients by adding one-third of the flour mixture to the batter. Mix on low speed until just incorporated. Pour in half of the buttermilk and mix again. Continue with another third of flour, remaining buttermilk, and finish with the last third of flour. Mix only until the ingredients are incorporated – overmixing will result in a tough cake.
- Divide the batter by measuring out 2½ cups of the vanilla batter and transferring it to another bowl.
- Create the chocolate batter by adding cocoa powder, sugar, milk, and optional espresso powder to the separated portion. Fold gently with a rubber spatula until the mixture is uniform in color with no streaks remaining.
- Begin the zebra pattern by spooning 3 tablespoons of vanilla batter into the center of each prepared pan. Allow it to spread slightly on its own for a few seconds.
- Add 3 tablespoons of chocolate batter directly on top of the vanilla batter in the center. It will push the vanilla batter outward, creating the first ring.
- Continue alternating batters in the center of the pan, allowing each addition to push the previous batter outward. The batter should naturally form concentric rings that will create the zebra effect when baked.
- Tap the pans gently on the counter a few times to remove any air bubbles and help the batter spread evenly.
- Bake for 45-60 minutes until the tops are domed and spring back when lightly touched. A toothpick inserted into the center should come out mostly clean with just a few moist crumbs.
- Cool the cakes in their pans for 10-15 minutes before turning them out onto wire racks to cool completely. The cakes should release easily if you’ve used parchment paper.
- Level the cakes if needed by using a long serrated knife to slice off any domed tops, creating flat surfaces for stacking and frosting.
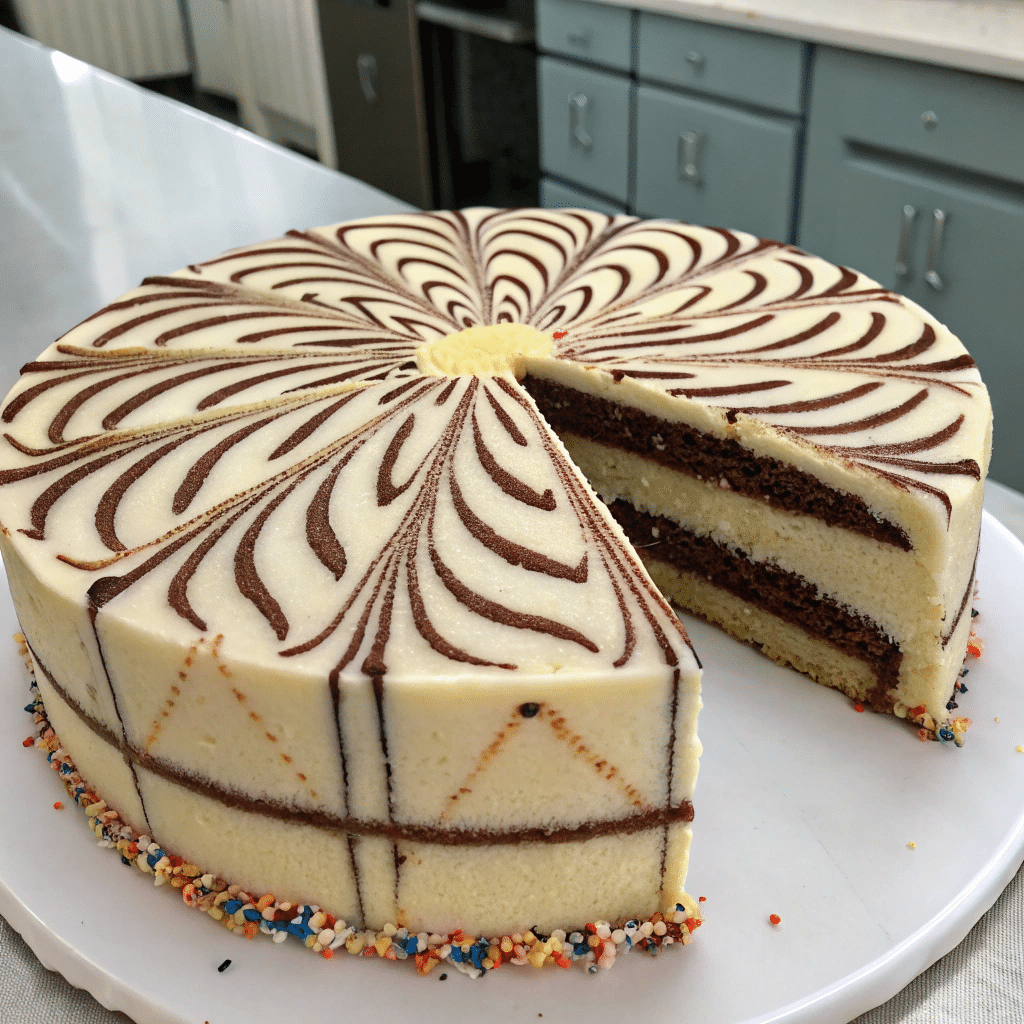
When sliced, your cake should reveal beautiful alternating rings of vanilla and chocolate that create the distinctive zebra pattern. The cake layers should be moist with a tender crumb and have clearly defined stripes throughout.
Nutritional Information
Understanding the nutritional content of your zebra cake helps you make informed decisions about how it fits into your overall diet. Each serving of this delicious treat provides a balance of carbohydrates, fats, and a small amount of protein.
| Nutrient | Amount per Serving | % Daily Value |
|---|---|---|
| Calories | 330 | – |
| Total Fat | 15g | 23% |
| Saturated Fat | 8g | 40% |
| Trans Fat | 0g | – |
| Cholesterol | 0mg | 0% |
| Sodium | 150mg | 7% |
| Total Carbohydrates | 47g | 17% |
| Dietary Fiber | 1g | 2% |
| Sugars | 32g | – |
| Protein | 2g | 0% |
| Vitamin D | 0μg | 0% |
| Calcium | 10mg | 1% |
| Iron | 0.7mg | 4% |
| Potassium | 40mg | 0% |
Serving Size: 1 slice (approximately 74g)
Servings Per Cake: 10-12 slices
This zebra cake has a relatively high calorie density with most of its calories coming from carbohydrates (57%) and fats (41%). The cake is not a significant source of essential vitamins and minerals but makes for a delightful occasional treat when enjoyed as part of a balanced diet.
Allergen Information
This zebra cake recipe contains several common allergens that should be noted for anyone with dietary restrictions or sensitivities. The cake contains wheat, eggs, milk, and soy which are among the most common food allergens. The white chocolate coating may also contain dairy unless specifically using a dairy-free alternative.
For those with gluten sensitivities, the all-purpose flour contains wheat gluten. If making this recipe gluten-free, substitute with a 1:1 gluten-free flour blend that contains xanthan gum for proper structure.
May contain traces of tree nuts depending on the brands of ingredients used, particularly in the chocolate and cocoa powder. Those with severe nut allergies should verify all ingredient sources carefully before preparation.
For a vegan version, substitute eggs with flax eggs (2 tablespoons ground flax seeds mixed with 4 tablespoons hot water per egg) and use plant-based milk and butter alternatives.
Safety Precautions
Ensuring food safety while preparing your zebra cake is essential for both enjoyable and healthy consumption. Follow these important precautions:
Temperature Control:
- Always bake the cake at the specified 350°F (180°C) to ensure proper cooking and destruction of any harmful bacteria.
- Use a food thermometer to verify the internal temperature reaches at least 160°F (71°C) in the center.
- Cool the cake at room temperature for no more than 2 hours before refrigerating to prevent bacterial growth.
Cross-Contamination Prevention:
- Thoroughly wash hands with soap and warm water for at least 20 seconds before beginning preparation.
- Clean and sanitize all work surfaces, utensils, and equipment before use.
- Use separate utensils for raw eggs and finished products to avoid cross-contamination.
Ingredient Safety:
- Verify all ingredients are fresh and within their expiration dates.
- Store eggs in the refrigerator until ready to use, and bring to room temperature only 30 minutes before mixing.
- If using raw eggs in frosting, consider using pasteurized eggs to eliminate the risk of salmonella.
Handling and Storage:
- Use clean, dry utensils when serving the cake.
- Store leftover cake in the refrigerator if it contains perishable frosting like cream cheese.
- Discard any cake left at room temperature for more than 2 hours.
Pro Tips & Tricks
Creating the perfect zebra cake requires attention to detail and a few expert techniques that will elevate your baking from good to exceptional. Here are some professional insights to help you master this showstopping dessert:
Batter Consistency is Key
The batter should be slightly runnier than standard cake batter to create those perfect zebra stripes. If your batter is too thick, add a splash of milk (approximately 15ml) to achieve a pourable consistency similar to cold custard. This thinner consistency allows the batters to spread properly when layered in the pan.
Room Temperature Ingredients
Always use room temperature ingredients, especially eggs, butter, and dairy products. Cold ingredients don’t incorporate properly and can result in a dense, uneven cake. Set your refrigerated items out at least 30-60 minutes before beginning.
Measure with Precision
For the most accurate results, use a kitchen scale rather than cup measurements. Properly measure flour by spooning it into measuring cups and leveling with a knife rather than scooping directly from the container, which compacts the flour.
Center Your Spoonfuls
When creating the zebra pattern, keep your spoonfuls as centered as possible. Try not to drip batter as you pour, as these drips will show up in the finished pattern. Each addition should be placed directly in the center of the previous one to maintain the concentric rings.
Don’t Overmix
Mix your cake batter just until the ingredients are incorporated. Overmixing develops gluten, resulting in a tough cake rather than the tender, soft texture you want. This is especially important after adding the flour mixture.
Serving & Pairing Guide
The visual drama of a zebra cake deserves an equally impressive presentation and thoughtful pairings to create a memorable dessert experience.
Elegant Presentation Ideas
- Serve on a white or black cake stand to enhance the zebra theme
- Dust the top with powdered sugar using a paper doily as a stencil for an elegant pattern
- Add a single fresh flower or chocolate decoration as a focal point
- For special occasions, create a chocolate ganache drip around the edges for added drama
- Slice the cake at the table to showcase the stunning zebra pattern to guests
Complementary Beverages
- Coffee: A rich espresso or cappuccino balances the sweetness of the cake
- Milk: Cold whole milk is a classic pairing that enhances both vanilla and chocolate flavors
- Tea: Earl Grey or chai tea offers aromatic notes that complement the cake’s flavors
- Dessert Wine: A sweet Moscato d’Asti or late harvest Riesling pairs beautifully for adult gatherings
Side Accompaniments
- Fresh berries: Serve with a side of mixed berries for a bright, acidic contrast
- Vanilla bean ice cream: The cool creaminess enhances the cake’s texture
- Chocolate sauce: Drizzle warm chocolate sauce on the plate before placing the cake slice
- Whipped cream: A dollop of lightly sweetened whipped cream adds a luxurious touch
For a complete dessert course, consider serving small slices of zebra cake alongside mini dessert cups filled with fresh fruit and cream for a balanced sweet ending to any meal.
Recipe Variations
The classic zebra cake provides a perfect canvas for creative adaptations to suit different dietary needs, flavor preferences, and seasonal ingredients.
Dietary Adaptations
Gluten-Free Version
Substitute the all-purpose flour with a high-quality 1:1 gluten-free flour blend that contains xanthan gum. Add an extra egg to provide additional structure and moisture that gluten-free flours sometimes lack.
Vegan Option
Replace eggs with flax eggs (1 tablespoon ground flaxseed mixed with 3 tablespoons water per egg). Substitute butter with vegan butter or coconut oil, and use plant-based milk mixed with 1 tablespoon apple cider vinegar in place of buttermilk. Use dairy-free yogurt instead of sour cream.
Reduced Sugar Alternative
Decrease sugar by up to 25% without significantly affecting texture. Consider using a monk fruit/erythritol blend for part of the sugar to further reduce calories while maintaining sweetness.
Flavor Variations
Citrus Zebra Cake
Add 2 tablespoons of orange zest to the vanilla batter and 1 tablespoon of orange extract. For the chocolate portion, consider adding 1 teaspoon of orange extract to create a chocolate-orange combination.
Mocha Zebra Cake
Dissolve 2 tablespoons of espresso powder in the milk before adding to the chocolate batter. This creates a sophisticated coffee-chocolate flavor profile perfect for adult palates.
Seasonal Adaptations
Summer Berry Zebra Cake
Fold 1 cup of fresh blueberries or raspberries into the vanilla batter. After baking, serve with additional fresh berries and a berry coulis.
Fall Spice Zebra Cake
Add 1 teaspoon of cinnamon, ¼ teaspoon of nutmeg, and ⅛ teaspoon of cloves to the vanilla batter. Consider a maple cream cheese frosting to complement these warm spices.
Holiday Peppermint Zebra Cake
Add ½ teaspoon of peppermint extract to the chocolate batter and top the finished cake with crushed candy canes for a festive Christmas dessert.
Storage & Reheating Guide
Proper storage is essential to maintain the freshness and flavor of your zebra cake. When stored correctly, this delightful treat can be enjoyed for days after baking.
Room Temperature Storage
For short-term storage of 2-3 days, keep your zebra cake in an airtight container at room temperature. This method preserves the cake’s moisture and texture better than refrigeration. Make sure the container is completely sealed to prevent the cake from drying out.
Refrigerator Storage
If you need to store your zebra cake longer, place it in an airtight container in the refrigerator for up to 6 days. The key is keeping it covered to prevent it from absorbing other food odors or drying out. Before serving refrigerated cake, allow it to sit at room temperature for about 30 minutes to restore its soft texture and enhance the flavors.
Freezer Storage
Zebra cake freezes exceptionally well for up to 3 months. For best results:
- Allow the cake to cool completely
- Wrap individual slices in plastic wrap, then aluminum foil
- Place wrapped slices in a freezer-safe container or bag
- Label with the date of freezing
- Thaw overnight in the refrigerator before serving
Reheating Tips
To refresh your zebra cake:
- Microwave individual slices for 10-15 seconds to restore moisture and warmth
- For a slight crispness on the edges, place a slice in a 300°F (150°C) oven for 5 minutes
Troubleshooting Guide
Even experienced bakers encounter challenges when making zebra cake. Here are solutions to common problems:
Cake Sinking in the Middle
- Cause: Opening the oven door too early, underbaking, or overmixing the batter
- Solution: Keep the oven door closed for at least 30 minutes of baking, ensure proper baking time, and mix just until ingredients are incorporated
Uneven or Blurry Stripes
- Cause: Batters with different consistencies or improper layering technique
- Solution: Ensure both vanilla and chocolate batters have the same thickness. Always pour each new spoonful directly in the center of the previous one
Dry Cake Texture
- Cause: Overbaking, too much flour, or incorrect measuring
- Solution: Test for doneness when a few moist crumbs still cling to the toothpick, measure flour by spooning into measuring cups rather than scooping, and follow recipe liquid measurements precisely
Dense, Heavy Cake
- Cause: Overmixing, incorrect oven temperature, or improper ingredient measurement
- Solution: Mix only until ingredients are combined, verify oven temperature with a thermometer, and use proper measuring techniques for dry ingredients
Dark, Caramelized Edges
- Cause: Dark-colored pans, oven running hot, or improper pan placement
- Solution: Use light-colored metal pans, check oven temperature with a thermometer, and position pans in the center of the oven away from walls
Common Mistakes
Avoid these frequent errors to ensure your zebra cake turns out perfectly every time:
Inconsistent Batter Consistency
When the vanilla and chocolate batters have different thicknesses, the zebra pattern becomes blurred. Both batters should have identical consistency for clear, defined stripes.
Overmixing the Batter
This is the most common mistake, responsible for dense, tunnel-filled cakes. Mix only until ingredients are just combined to maintain a light, tender crumb.
Incorrect Oven Temperature
Many home ovens run 25°F higher or lower than indicated. Use an oven thermometer to verify your temperature setting is accurate.
Rushing the Pattern Creation
Pouring batter too quickly or carelessly disrupts the zebra pattern. Take your time with each tablespoon of batter, allowing it to spread naturally before adding the next.
Improper Measuring Techniques
Scooping flour directly from the container compacts it, adding too much to your recipe. Always spoon flour into measuring cups and level with a knife for accurate measurements.
Opening the Oven Door Too Soon
This causes temperature fluctuations that can make your cake sink. Resist checking until at least 30 minutes into baking time.
Fun Facts & Trivia
Did you know that the zebra cake’s distinctive pattern has a fascinating history? The concept originated from traditional German marble cakes (Marmorkuchen) in the early 19th century, where bakers created swirled patterns with contrasting batters. The more precise zebra striping technique evolved later as bakers refined their methods.
The commercial Little Debbie Zebra Cakes feature a mascot named Zain the Zebra who appears on their packaging. These iconic treats weren’t always called “Zebra Cakes” – they were originally marketed as “Little Debbie Vanilla Snack Cakes” until the early 1990s when they were rebranded with their now-famous name.
While most home bakers create zebra cakes in round pans to showcase the circular striped pattern, the technique works beautifully in any shape pan. Some creative bakers have made heart-shaped zebra cakes for Valentine’s Day or bundt zebra cakes for an elegant twist on the classic.
The zebra pattern isn’t limited to just chocolate and vanilla! Creative bakers have made rainbow zebra cakes using food coloring to create multiple colored layers, or seasonal versions with pumpkin spice and vanilla for fall, or mint and chocolate for holiday celebrations.
In some European bakeries, zebra cakes are given as gifts for special occasions because the intricate interior pattern symbolizes the layers and complexity of relationships. The surprise element when cutting into what appears to be a simple cake from the outside represents how there’s always more to discover about those we care about.
Final Summary and Call to Action
The zebra cake stands as a testament to how simple ingredients and techniques can create something truly extraordinary. What appears to be a plain cake from the outside reveals a mesmerizing pattern of stripes when sliced, delighting everyone at the table. The beauty of this recipe lies in its versatility – whether you’re making a classic chocolate and vanilla version, experimenting with seasonal flavors, or adapting it for dietary needs, the zebra cake never fails to impress.
Now that you’ve mastered this showstopping dessert, it’s time to let your creativity shine! Try different flavor combinations like lemon and blueberry, or experiment with natural food colorings for vibrant variations. Share your zebra cake creations on social media using #ZebraCakeMasterpiece to inspire others and join our community of baking enthusiasts.
Remember that practice makes perfect when it comes to creating those distinct zebra stripes. Don’t be discouraged if your first attempt isn’t picture-perfect – each cake will have its own unique pattern, and that’s part of the charm! The most important thing is that it tastes delicious and brings joy to those who share it.
So heat up your oven, gather your ingredients, and prepare to amaze your friends and family with this deceptively simple yet visually stunning dessert. Your zebra cake journey begins now – and we can’t wait to see where it takes you!
For more recipes, visit my Facebook page.
Frequently Asked Questions
Q: Can I make zebra cake ahead of time?
A: Absolutely! Zebra cake can be made 1-2 days in advance. Store it in an airtight container at room temperature for best texture and flavor. If you’re making it more than 2 days ahead, refrigerate it in an airtight container for up to 6 days or freeze for up to 3 months.
Q: Why is my zebra pattern not showing up clearly?
A: The most common reason for unclear zebra patterns is inconsistent batter thickness between the vanilla and chocolate portions. Both batters should have identical consistency. Also, make sure you’re placing each spoonful directly in the center of the previous one and not tilting or jiggling the pan before baking.
Q: Can I make zebra cake without oil?
A: Yes! While traditional zebra cake recipes call for oil, you can substitute with melted butter for a richer flavor. Use the same amount of melted butter as the oil called for in the recipe. Some bakers prefer using half butter and half oil for both moisture and flavor.
Q: Can I make a gluten-free version of zebra cake?
A: Definitely! Substitute the all-purpose flour with a high-quality 1:1 gluten-free flour blend that contains xanthan gum. Adding an extra egg can help provide additional structure that gluten-free flours sometimes lack. The zebra pattern works just as beautifully with gluten-free batters.
Q: How do I know when my zebra cake is done baking?
A: A properly baked zebra cake will spring back when lightly touched in the center and a toothpick inserted into the middle should come out with just a few moist crumbs (not wet batter). Avoid opening the oven door during the first 30 minutes of baking as this can cause the cake to sink.
Q: What are the store-bought Little Debbie Zebra Cakes made of?
A: The commercial Little Debbie Zebra Cakes consist of yellow sponge cake with crème filling, covered in white icing and decorated with chocolate fudge stripes. They come individually wrapped for freshness and are a nostalgic treat for many Americans since their introduction.
Comments are closed.