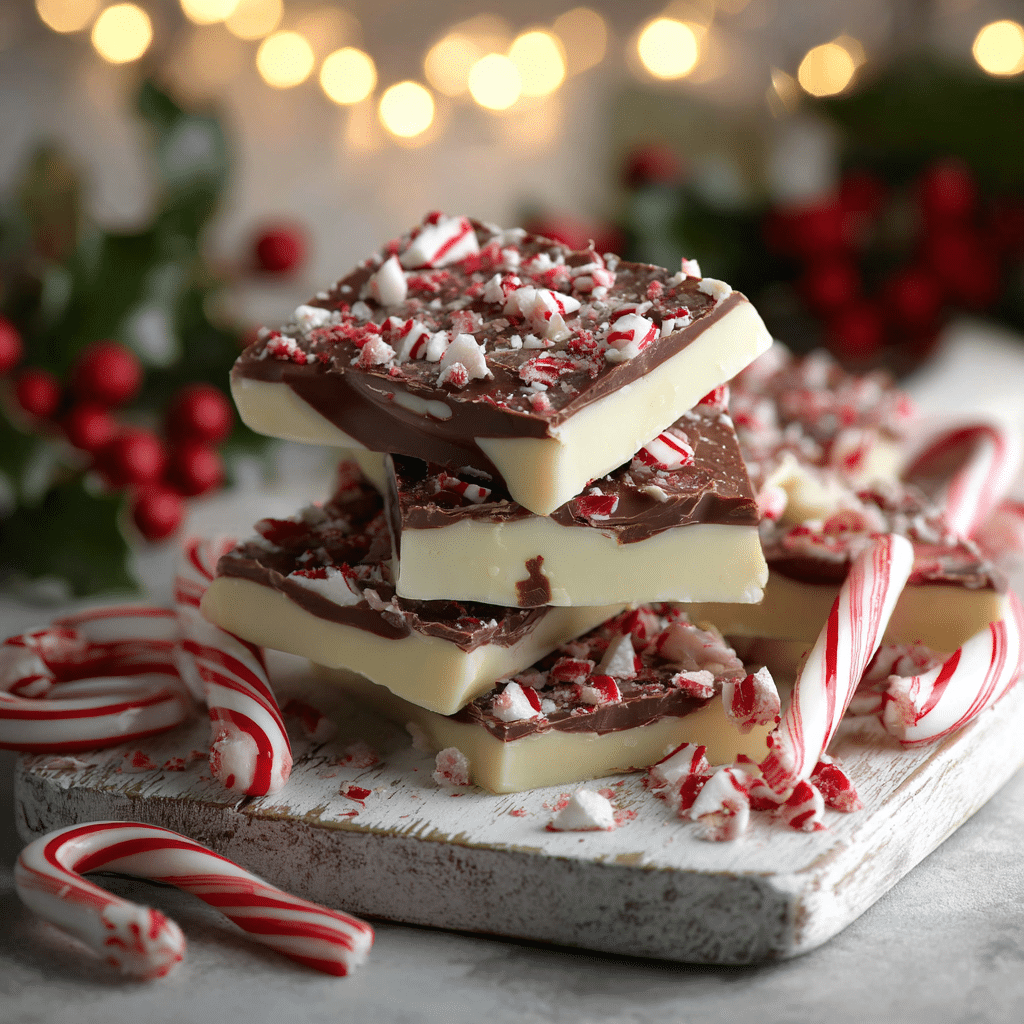
Are you ready to create the most irresistible holiday dessert that looks like it came from a gourmet chocolatier? This Easy Peppermint Bark Recipe features three gorgeous layers of creamy white chocolate and rich semi-sweet chocolate, infused with refreshing peppermint extract and topped with festive crushed candy canes. Whether you’re planning your holiday baking lineup, searching for Christmas treats to make as gifts, or simply want a show-stopping dessert for your holiday gatherings, this peppermint bark checks all the boxes.
The best part? You don’t need any special equipment or advanced baking skills. With just a handful of ingredients and about 30 minutes of active time, you’ll have a batch of professional-looking peppermint bark that tastes absolutely divine. Let’s dive into everything you need to know to make this festive treat!
Table of Contents
Why You’ll Love This Peppermint Bark Recipe
This isn’t just another Christmas dessert idea it’s a holiday game-changer. Here’s why this recipe deserves a spot in your seasonal baking rotation:
Simple Ingredients: You only need white chocolate, semi-sweet chocolate, peppermint extract, candy canes, and a touch of oil. That’s it!
No-Bake Convenience: Unlike cookies or cakes, this recipe requires zero oven time. Just melt, layer, and chill.
Make-Ahead Friendly: Prepare your peppermint bark up to 3 weeks in advance and store it in the refrigerator. Perfect for stress-free holiday planning!
Gift-Worthy Presentation: Package pieces in cellophane bags or festive tins for beautiful homemade gifts that friends and family will treasure.
Crowd-Pleasing Flavor: The combination of creamy chocolate and cool peppermint creates an irresistible taste that appeals to kids and adults alike.
Ingredients You’ll Need
Here’s everything required to make this spectacular holiday treat:
| Ingredient | Quantity | Notes |
|---|---|---|
| White chocolate | 12 ounces (339g), divided | Use high-quality chocolate for best results |
| Semi-sweet or bittersweet chocolate | 6 ounces (170g) | Choose your preferred darkness level |
| Vegetable or coconut oil | 1½ teaspoons, divided | Helps create smooth, glossy layers |
| Peppermint extract | ½ teaspoon, divided | Pure extract works best |
| Candy canes | 2-3 regular-size (24-36g) | Crushed for topping |
Ingredient Tips
Chocolate Quality Matters: While you can use chocolate chips, chopped chocolate bars or melting wafers tend to create smoother, more professional-looking layers.
Extract vs. Oil: Always use peppermint extract rather than peppermint oil, which is much more concentrated and can overpower the chocolate.
Candy Cane Freshness: Fresh, crisp candy canes crush better than old, sticky ones. Buy them at the beginning of the season for best results.
Step-by-Step Instructions
Step 1: Prepare Your Pan
Line the bottom and sides of an 8-inch or 9-inch square baking pan with parchment paper or aluminum foil, smoothing out any wrinkles. You can also use a lined baking sheet if you prefer thinner bark. Set aside.
Step 2: Create the Bottom White Chocolate Layer
Place 6 ounces of white chocolate in a small heatproof bowl or liquid measuring cup. Add ½ teaspoon of oil. Melt in 20-second increments in the microwave, stirring vigorously with a silicone spatula after each increment until completely melted and smooth.
White chocolate overheats easily, so patience is key! Once melted, stir in ¼ teaspoon peppermint extract. Pour the melted white chocolate into your prepared pan and spread it into a thin, smooth layer with an offset spatula.
Refrigerate for 10-15 minutes until almost completely set (but not fully hardened, or the layers may separate later).
Step 3: Add the Semi-Sweet Chocolate Middle Layer
Place the semi-sweet chocolate in a small heatproof bowl with ½ teaspoon of oil. Repeat the melting process from Step 2, using 20-second increments and stirring between each. Once smooth, stir in the remaining ¼ teaspoon peppermint extract.
Pour the semi-sweet chocolate over the white chocolate layer and spread evenly. Return the pan to the refrigerator for another 10-15 minutes until almost set.
Step 4: Finish with the Top White Chocolate Layer
Place the remaining 6 ounces of white chocolate in a heatproof bowl with the last ½ teaspoon of oil. Melt following the same careful process. This layer won’t include peppermint extract, allowing the candy cane topping to provide the final minty punch.
Pour over the previous layers and spread smooth. Immediately sprinkle with crushed candy canes.
Pro Tip: To crush candy canes, place unwrapped canes in a sealed zip-top bag and use a rolling pin or meat mallet to break them into pieces.
Step 5: Chill and Break
Refrigerate the bark until completely set, about 1 hour. Once hardened, remove from the pan and peel off the foil or parchment. Break or cut into pieces as large or small as you prefer.
If your bark has been refrigerated for more than 3-4 hours, let it sit at room temperature for 10-15 minutes before breaking to prevent the layers from separating.

Expert Tips for Perfect Peppermint Bark
Don’t Rush the Layers: Allowing each layer to almost set (but not completely) before adding the next ensures the layers bond together without separating when you cut the bark.
Temperature Control: Overheated chocolate can seize or become grainy. Always use short microwave intervals and stir thoroughly between each.
Uniform Candy Cane Pieces: For the prettiest presentation, aim for a mix of fine crumbs and small chunks when crushing your candy canes.
Storage Matters: Keep your bark in an airtight container in the refrigerator for best texture, especially in warmer environments.
Storage and Serving Suggestions
Cover and store leftover bark in the refrigerator for up to 3 weeks. The bark can be left at room temperature for a few days during colder months, but it may soften slightly.
Serving Ideas:
- Package in clear cellophane bags tied with festive ribbon for gift-giving
- Arrange on a holiday dessert platter alongside cookies and fudge
- Crush into pieces and sprinkle over ice cream or hot chocolate
- Use as an edible decoration for Christmas cakes or cupcakes
Frequently Asked Questions
Can I use chocolate chips instead of chopped chocolate?
Yes, chocolate chips work, though they may not create as smooth a layer due to stabilizers that help them hold their shape. For best results, add a bit of extra oil.
Why did my chocolate layers separate?
This usually happens when the first layer sets completely before adding the next. Make sure each layer is only almost set still slightly tacky before adding the next layer.
Can I use dark chocolate instead of semi-sweet?
Absolutely! Dark chocolate creates a more sophisticated, less sweet bark that many adults prefer. Use your favorite variety.
How do I prevent white chocolate from seizing?
Melt white chocolate slowly in short intervals, stirring frequently. Avoid getting any water in your bowl, as even a drop can cause chocolate to seize.
Can I add other toppings?
Yes! Try crushed Oreos, chopped nuts, mini chocolate chips, or festive sprinkles alongside or instead of candy canes.
Is this recipe kid-friendly to make?
With adult supervision for the melting steps, this is a great recipe for kids. They’ll love crushing the candy canes and sprinkling them on top!
Make This Christmas Dessert Today!
This Easy Peppermint Bark Recipe is everything you love about holiday baking simple, festive, delicious, and absolutely stunning. Whether you’re adding it to your Christmas treats to make list, preparing edible gifts, or creating a beautiful dessert spread, this three-layer wonder will become a cherished tradition in your home.
The combination of smooth chocolate layers and refreshing peppermint creates a flavor experience that captures the magic of the season in every bite. Plus, with its make-ahead convenience and impressive presentation, you’ll find yourself turning to this recipe year after year.
Ready to create your own batch of this irresistible Christmas dessert? Gather your ingredients, clear some refrigerator space, and let’s make some peppermint bark magic! Your friends and family will be asking for this recipe all season long.
Pin this recipe now and make your holidays sweeter!
PrintEasy Peppermint Bark Recipe – The Ultimate Christmas Treat

This easy peppermint bark features three gorgeous layers of white and semi-sweet chocolate infused with refreshing peppermint extract and topped with crushed candy canes. Perfect for holiday gifts or festive dessert platters!
- Prep Time: 15
- Total Time: 1 hour 15 minutes
- Yield: 24 pieces
- Category: Dessert
- Method: No-Bake
- Cuisine: American
Ingredients
6 ounces white chocolate, coarsely chopped (for bottom layer)
6 ounces white chocolate, coarsely chopped (for top layer)
6 ounces semi-sweet or bittersweet chocolate, coarsely chopped
1½ teaspoons vegetable oil or coconut oil, divided
½ teaspoon peppermint extract, divided
2–3 regular-size candy canes (24-36g total), crushed
Instructions
1. Line an 8-inch or 9-inch square baking pan with parchment paper or aluminum foil, smoothing out wrinkles. Set aside.
2. Place 6 ounces white chocolate in a heatproof bowl with ½ teaspoon oil. Microwave in 20-second increments, stirring vigorously after each, until completely melted and smooth. Stir in ¼ teaspoon peppermint extract.
3. Pour melted white chocolate into prepared pan and spread into a thin, smooth layer. Refrigerate for 10-15 minutes until almost completely set.
4. Place semi-sweet chocolate in a heatproof bowl with ½ teaspoon oil. Melt in 20-second increments, stirring between each. Once melted, stir in remaining ¼ teaspoon peppermint extract.
5. Pour semi-sweet chocolate over white chocolate layer and spread evenly. Refrigerate for 10-15 minutes until almost set.
6. Place remaining 6 ounces white chocolate in a heatproof bowl with last ½ teaspoon oil. Melt using same method (no peppermint extract in this layer).
7. Pour over previous layers and spread smooth. Immediately sprinkle with crushed candy canes.
8. Refrigerate until completely set, about 1 hour. Remove from pan, peel off liner, and break into pieces. If chilled longer than 3-4 hours, let sit at room temperature 10-15 minutes before breaking.
Notes
White chocolate and chocolate overheat easily, so use short microwave intervals and stir thoroughly.
Don’t let the first two layers set completely before adding the next, or they may separate when cut.
To crush candy canes, place unwrapped canes in a sealed zip-top bag and crush with a rolling pin.
Store covered in refrigerator for up to 3 weeks.
Can be left at room temperature for a few days in colder months, but may soften slightly.