This post may contain affiliate links. Please read our disclosure policy.
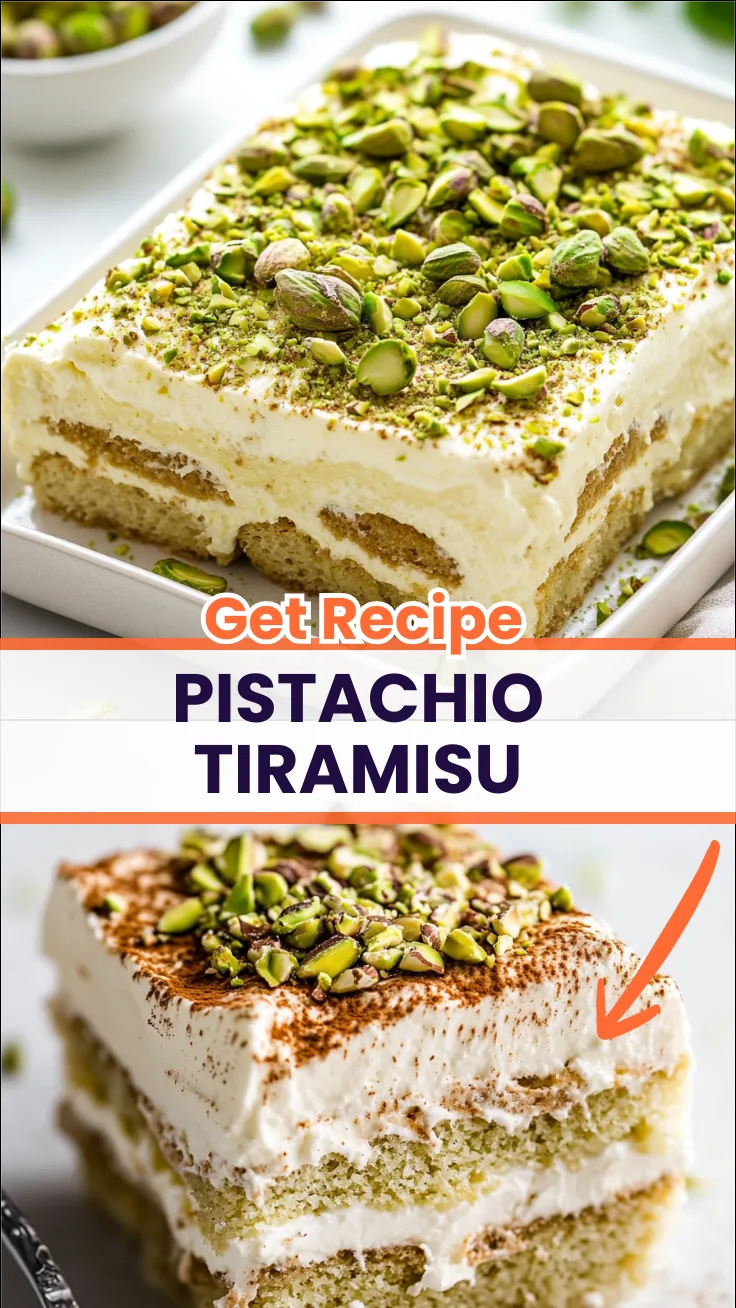
If you are looking for a dessert that combines elegance, ease, and unforgettable flavor, this Pistachio Tiramisu is exactly what your table needs. Layers of espresso-soaked ladyfingers are sandwiched between a cloud-like mascarpone and pistachio cream filling, then finished with a generous shower of crushed raw pistachios. It is no-bake, make-ahead friendly, and guaranteed to be the star of any Mother’s Day brunch, spring brunch spread, or special occasion. Whether you are a seasoned baker or a first-timer, this recipe comes together in about 30 minutes of active prep and the result tastes like something straight from an Italian pasticceria with a modern pistachio twist.
What makes this pistachio tiramisu stand out from a classic version is the pistachio cream layered directly into the mascarpone filling. That nutty, slightly sweet richness pairs beautifully with the bitterness of espresso and the delicate crunch of crushed pistachios on top. It is the kind of dessert that looks impressive, travels well to brunches, and can be made the night before which makes it one of the best brunch recipes for stress-free entertaining.
Table of Contents
Why You Will Love This Recipe
- No baking required just layer, chill, and serve
- Perfect make-ahead dessert for Mother’s Day brunch or spring brunch gatherings
- Rich, creamy mascarpone filling elevated with real pistachio cream
- Ready in 30 minutes of prep with a minimum 3-hour chill time
- Feeds a crowd from a single 13×9 pan
- Elegant enough for floral desserts tables and celebration spreads
Ingredients
Gather everything before you start. Accurate measurements matter in a no-bake dessert like this, so a kitchen scale and a measuring cups and spoons set will be your best friends here.
| Ingredient | Quantity | Notes |
|---|---|---|
| Heavy cream | 3 cups | Cold, for best whipping results |
| Confectioners’ sugar | 2 Tbsp. | Sifted |
| Kosher salt | 1/2 tsp. | Balances the sweetness |
| Mascarpone | 16 oz. | Room temperature |
| Store-bought pistachio cream | 2 cups | Good quality brand recommended |
| Ladyfingers | 48 | Savoiardi-style |
| Cold espresso or strongly brewed coffee | 2 cups | Must be cold before dipping |
| Almond extract | 2 tsp. | Enhances the pistachio flavor |
| Raw pistachios, crushed | 6 oz. (about 1 1/2 cups) | For topping |
Kitchen Equipment You Will Need
Having the right tools on hand makes assembling this tiramisu smooth and efficient. Here is what you will need:
- Electric mixer essential for whipping the cream to perfect medium peaks
- Mixing bowls you will need at least two large ones
- Measuring cups and spoons set for precise ingredient portions
- Kitchen scale helpful for weighing pistachios and mascarpone
- Kitchen utensils spatulas for folding the cream layers
- Cutting board for crushing the pistachios
- Chef’s knife to roughly chop pistachios if not using a bag method
Step-by-Step Instructions
Step 1 : Whip the Cream
Pour the cold heavy cream into the large bowl of your electric mixer fitted with the whisk attachment. Add the confectioners’ sugar and kosher salt. Beat on medium-high speed until medium peaks form. You want the cream to hold its shape when the whisk is lifted but still look soft and billowy do not whip to stiff peaks or the texture of your filling will become grainy. Set aside.
Step 2 : Make the Pistachio Mascarpone Filling
In one of your large mixing bowls, combine the mascarpone and pistachio cream. Stir until smooth and fully incorporated. Add about one-third of your whipped cream into the mascarpone mixture and fold gently to lighten it. Then fold the mascarpone mixture back into the remaining whipped cream, using slow, deliberate strokes to keep the filling airy and voluminous. Do not stir aggressively folding is key to maintaining a light, mousse-like texture.
Step 3 : Dip the Ladyfingers
In a shallow dish or long container, combine the cold espresso and almond extract. Using your kitchen utensils, quickly dip each ladyfinger into the coffee mixture for about 1 second per side no longer. Over-soaking will make them fall apart and create a soggy tiramisu. Line the bottom of a 13×9 inch pan with the dipped cookies, fitting 2 rows of 12 ladyfingers vertically.
Step 4 : Layer the Tiramisu
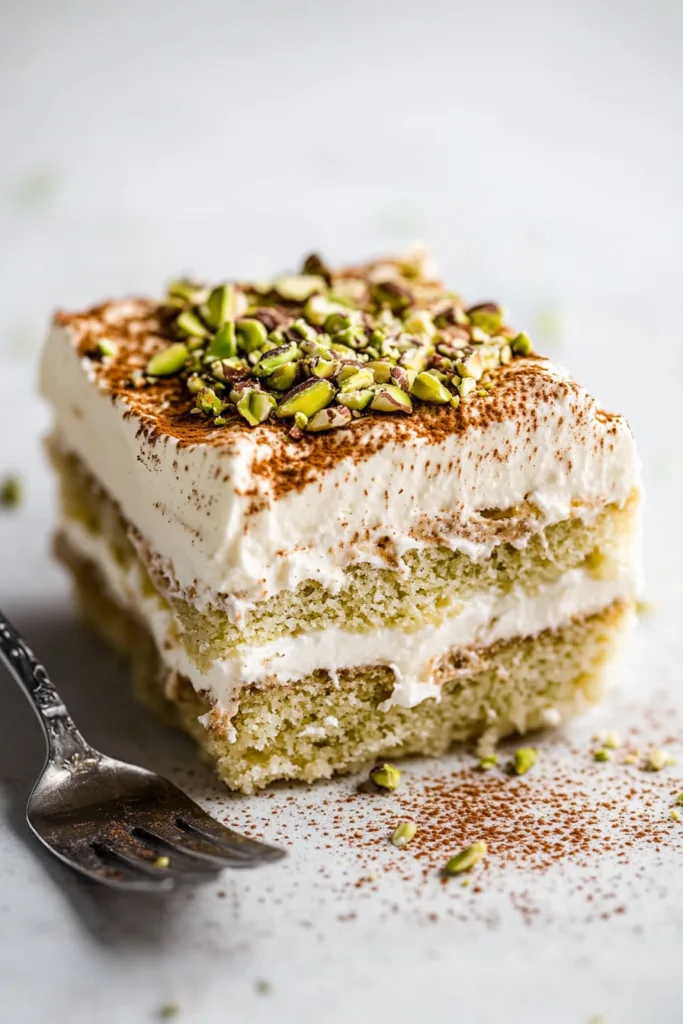
Spread half of the pistachio mascarpone cream mixture evenly over the first layer of ladyfingers using a spatula. Repeat the process with the remaining ladyfingers and the rest of the cream mixture. Make sure the top layer of cream is smooth and even this is the canvas for your pistachio topping.
Step 5 : Top and Chill
Sprinkle the crushed raw pistachios generously over the entire surface of the tiramisu. Cover the pan tightly and refrigerate for at least 3 hours, though overnight is ideal. The chill time allows the layers to set and the flavors to meld together beautifully.
Pro Tips for the Best Pistachio Tiramisu
- Use cold heavy cream straight from the refrigerator warm cream will not whip properly with your electric mixer
- Make sure your espresso is fully cooled before dipping hot coffee will disintegrate the ladyfingers instantly
- Do not skip the almond extract it amplifies the pistachio flavor in a way that makes the dessert taste more complex
- For clean slices, chill overnight and use a sharp knife wiped clean between each cut
- Choose a high-quality pistachio cream for the most vibrant color and richest flavor
- If you want a stronger coffee flavor, you can brush the ladyfingers lightly with extra espresso after placing them in the pan
Serving Suggestions
This pistachio tiramisu fits seamlessly into a Mother’s Day brunch spread alongside mimosa recipes, fresh fruit platters, and floral desserts. Serve it chilled, cut into generous squares, and garnish each portion with a few extra whole pistachios for a polished presentation. It pairs wonderfully with a shot of espresso or a glass of Prosecco.
Make-Ahead and Storage
One of the greatest advantages of this recipe is that it is fully make-ahead. You can prepare it up to 24 hours in advance and keep it covered in the refrigerator. Leftovers keep well for up to 3 days, though the ladyfingers will continue to soften over time. This dessert does not freeze well due to the dairy-based cream filling.
Frequently Asked Questions
Can I use homemade pistachio cream instead of store-bought?
Absolutely. If you have a food processor, you can blend raw pistachios with a bit of sugar, neutral oil, and a splash of milk until you reach a smooth, spreadable consistency. Homemade pistachio cream will give you even more control over sweetness and flavor intensity.
Do I have to use espresso?
No. Strongly brewed coffee works perfectly well. You can also use decaf espresso if you are serving this to children or guests who are sensitive to caffeine. The key is that the coffee must be cold and strong enough to flavor the ladyfingers without making them soggy.
Can I make this pistachio tiramisu without alcohol?
Yes this recipe is already alcohol-free. Traditional tiramisu sometimes includes Marsala wine or a coffee liqueur, but this version skips that entirely, making it family-friendly and suitable for all brunch guests.
What if I cannot find ladyfingers?
Savoiardi ladyfingers are widely available in Italian grocery stores and many mainstream supermarkets. In a pinch, you can substitute sponge cake fingers or even thinly sliced pound cake, though the texture will be slightly different.
How do I crush the pistachios?
Place the raw pistachios in a zip-lock bag and roll over them with a rolling pin, or give them a rough chop on your cutting board using a chef’s knife. You want a mix of finer crumbs and small chunks for the best texture contrast on top.
Can I make individual portions?
Yes. Instead of a 13×9 pan, divide the layers among individual glasses or ramekins. This is a beautiful option for a plated dessert at a formal brunch or dinner party.
Ready to Make This Recipe?
This Pistachio Tiramisu is the kind of recipe you will come back to again and again simple to prepare, stunning to present, and impossible to stop eating. Save this recipe to your Pinterest boards, share it with a friend who loves brunch recipes, and tag us when you make it. We would love to see your creation.
If you found this recipe helpful, feel free to check out the kitchen equipment. Click on any url to view and purchase the product through our Amazon affiliate links at no extra cost to you. Your support helps us keep Deliciousavors.com running and bringing you great recipes!
PrintPistachio Tiramisu : Creamy No-Bake Dessert Ready in 30 Minutes
Pistachio Tiramisu is a no-bake Italian-inspired dessert with espresso-soaked ladyfingers, a silky mascarpone and pistachio cream filling, and a topping of crushed raw pistachios. Make-ahead friendly and perfect for Mother’s Day brunch or any spring gathering.
- Prep Time: 30 minutes
- Cook Time: 0 minutes
- Total Time: 3 hours 30 minutes
- Yield: 12 servings
- Category: Dessert
- Method: No-Bake
- Cuisine: Italian
- Diet: Vegetarian
Ingredients
3 cups heavy cream 2 Tbsp. confectioners’ sugar 1/2 tsp. kosher salt 16 oz. mascarpone 2 cups store-bought pistachio cream 48 ladyfingers 2 cups cold espresso or strongly brewed coffee 2 tsp. almond extract 6 oz. raw pistachios, crushed (about 1 1/2 cups)
Instructions
Beat cold heavy cream, confectioners’ sugar, and kosher salt in a stand mixer on medium-high speed until medium peaks form. Do not over-whip. In a large bowl, mix mascarpone and pistachio cream until smooth. Fold in one-third of the whipped cream to lighten, then fold the mixture into the remaining whipped cream. Combine cold espresso and almond extract in a shallow dish. Dip each ladyfinger for about 1 second and line the bottom of a 13×9 pan with 2 rows of 12 cookies. Spread half of the pistachio cream filling evenly over the first ladyfinger layer. Repeat with remaining ladyfingers and the rest of the cream mixture, smoothing the top. Sprinkle crushed pistachios over the surface. Cover and refrigerate for at least 3 hours or overnight before serving.
Notes
Do not over-soak the ladyfingers — 1 second per side is enough. Chill overnight for best texture and flavor. Store covered in the refrigerator for up to 3 days. Do not freeze — the cream filling does not freeze well. For clean slices, wipe the knife between each cut.