
This post may contain affiliate links. Please read our disclosure policy.
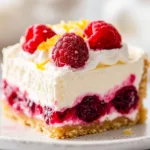
If you are looking for a show-stopping dessert that requires absolutely no oven time, this No-Bake Lemon Raspberry Cheesecake is exactly what you need. With a buttery digestive biscuit base, a thick and creamy lemon-infused cheesecake filling loaded with fresh raspberries, and a gorgeous whipped cream decoration, this cheesecake is as beautiful as it is delicious. Whether you are planning Easter food ideas for dinner, a spring party, or simply craving one of the most satisfying easy spring recipes out there, this dessert delivers every single time.
Table of Contents
Why You Will Love This Lemon Raspberry Cheesecake
- No baking required – just mix, chill, and serve
- Perfect for spring lunch ideas, spring party food, and holiday gatherings
- Bright lemon flavor balanced with sweet, tangy raspberries
- Creamy, rich filling that sets beautifully overnight
- Stunning presentation with minimal decorating effort
- A crowd-pleasing dessert the whole family will love
Ingredients You Will Need
This recipe uses simple, easy-to-find ingredients. Here is a full breakdown organized by component. Use a kitchen weight scale for precise measurements, and have your measuring cups and spoons set ready for smaller quantities.
Biscuit Base
| Ingredient | Amount |
|---|---|
| Digestive biscuits | 300 g (approx. 10.5 oz) |
| Unsalted butter, melted | 150 g (approx. 5.3 oz) |
Cheesecake Filling
| Ingredient | Amount |
|---|---|
| Full-fat cream cheese | 500-600 g (approx. 17-21 oz) |
| Icing sugar (powdered sugar) | 100 g (approx. 3.5 oz) |
| Double cream (heavy cream) | 300 ml (approx. 1.25 cups) |
| Fresh lemon juice | Juice of 2 lemons |
| Fresh raspberries | 300 g (approx. 10.5 oz) |
Decoration
| Ingredient | Amount |
|---|---|
| Double cream (heavy cream) | 150 ml (approx. 2/3 cup) |
| Icing sugar (powdered sugar) | 2 tablespoons |
| Fresh raspberries | A handful |
| Lemon zest | From 1 lemon |
| Freeze-dried raspberries | A light sprinkle |
Kitchen Equipment
Having the right tools makes this recipe effortless. Here is what you will need:
- Food processor – to blitz the digestive biscuits into fine crumbs quickly
- Rolling pin – alternative to the food processor for crushing biscuits by hand
- Mixing bowls – for the filling and decoration components
- Electric mixer – to whisk the cream cheese filling to a thick, smooth consistency
- Measuring cups and spoons set – for accurate ingredient portions
- Kitchen weight scale – for precise gram measurements
- Kitchen utensils – spatulas and spoons for folding and spreading
- Cutting board and chef’s knife – for prepping lemons and raspberries
Step-by-Step Instructions
Step 1 – Make the Biscuit Base
- Add your digestive biscuits to a food processor and blitz to a fine crumb. Alternatively, place them in a zip-lock bag and bash with the end of a rolling pin until finely crushed.
- Pour in the melted unsalted butter and mix until every crumb is fully coated and the mixture resembles wet sand.
- Press the mixture firmly and evenly into the bottom of a 20 cm (8-inch) deep springform tin. Set aside.
Step 2 – Make the Cheesecake Filling
- Add the full-fat cream cheese and icing sugar to a large mixing bowl. Using your electric mixer, whisk until completely smooth and lump-free.
- Pour in the double cream and whisk again until the mixture begins to thicken noticeably.
- Squeeze in the juice of 2 lemons and continue whisking until the filling is very thick and holds its shape. The lemon juice helps activate the thickening process quickly.
- Gently fold in the fresh raspberries using a spatula, being careful not to completely crush them – a few streaks of raspberry color throughout the filling are perfectly beautiful.
- Spoon and spread the filling evenly over the biscuit base. Smooth the top with the back of a spoon or an offset spatula.
- Refrigerate for at least 5 to 6 hours, or preferably overnight, until fully set and firm.
Step 3 – Decorate the Cheesecake
- Whisk together the double cream and icing sugar using your electric mixer until stiff peaks form.
- Transfer the whipped cream to a piping bag fitted with your favorite piping tip and pipe decorative swirls around the top edge of the cheesecake.
- Place a fresh raspberry on each swirl, then sprinkle the entire top of the cheesecake with fresh lemon zest and a light dusting of freeze-dried raspberries for color and crunch.
- Slice and serve straight from the refrigerator for the cleanest cuts.

Expert Tips for the Perfect No-Bake Cheesecake
- Always use full-fat cream cheese. Low-fat varieties contain too much moisture and will prevent the filling from setting properly.
- Make sure your cream cheese is at room temperature before mixing to avoid lumps in the filling.
- Use freshly squeezed lemon juice rather than bottled – the bright, natural acidity makes a significant difference in flavor and also helps thicken the filling.
- Do not skip the overnight chill. The longer the cheesecake sets, the firmer and easier it will be to slice cleanly.
- To remove the cheesecake cleanly from the springform tin, run a thin knife around the edge before releasing the clasp.
- If your filling feels too soft after whisking, refrigerate it for 15 minutes before spreading over the base.
- Fold the raspberries in gently at the end so some remain whole for texture and visual appeal.
Serving Suggestions
This Lemon Raspberry Cheesecake shines brightest when served chilled. It pairs beautifully with a light dusting of powdered sugar, a drizzle of raspberry coulis, or a sprig of fresh mint. It is ideal as a centerpiece dessert for Easter food ideas at dinner, a spring party food table, or any spring gathering where you want something visually stunning and truly delicious. Serve slices with a cold glass of sparkling lemonade or a fruity rose for an elevated experience.
Storage Instructions
- Store leftovers covered in the refrigerator for up to 3 days.
- For longer storage, freeze individual slices wrapped in plastic wrap and placed in an airtight container for up to 1 month.
- Thaw frozen slices in the refrigerator overnight before serving – do not thaw at room temperature.
- Avoid adding the decoration before freezing; decorate after thawing for the best presentation.
Frequently Asked Questions
Can I make this Lemon Raspberry Cheesecake ahead of time?
Yes. This cheesecake is ideal for making ahead. Prepare it the night before your event and keep it refrigerated. Add the decoration just before serving for the freshest look and taste.
Can I use frozen raspberries instead of fresh?
You can use frozen raspberries in the filling, but thaw them first and drain any excess liquid to avoid making the filling too wet. For the decoration, fresh raspberries are strongly recommended for the best appearance.
Why did my cheesecake filling not set?
The most common reason is that the cream was not whipped enough, or the cream cheese had too much moisture. Always whisk until the filling is visibly thick and holds its shape before spreading it over the base. Chill for the full recommended time.
Can I substitute digestive biscuits for another base?
Absolutely. Graham crackers are the best US substitute for digestive biscuits and will produce a very similar texture and flavor. You can also use shortbread cookies for a richer, butterier base.
How many servings does this Lemon Raspberry Cheesecake make?
This recipe makes approximately 10 to 12 generous slices from a standard 20 cm (8-inch) springform tin, making it perfect for spring party food or family gatherings.
Can I make this Lemon Raspberry Cheesecake gluten-free?
Yes. Simply swap the digestive biscuits for your favorite gluten-free biscuits or crackers and ensure all other ingredients are certified gluten-free. The filling itself is naturally gluten-free.
If you found this recipe helpful, feel free to check out the kitchen equipment. Click on any url to view and purchase the product through our Amazon affiliate links at no extra cost to you. Your support helps us keep Deliciousavors.com running and bringing you great recipes!
PrintNo-Bake Lemon Raspberry Cheesecake : Easy Spring Dessert Recipe
A no-bake Lemon Raspberry Cheesecake with a buttery digestive biscuit base, a thick creamy lemon filling packed with fresh raspberries, and a whipped cream decoration. Perfect for spring party food, Easter food ideas dinner, and easy spring recipes.
- Prep Time: 30 minutes
- Cook Time: 0 minutes
- Total Time: 6 hours (including chilling)
- Yield: 10-12 slices
- Category: Dessert
- Method: No-Bake
- Cuisine: British-American
- Diet: Vegetarian
Ingredients
300 g digestive biscuits
150 g unsalted butter, melted
500–600 g full-fat cream cheese
100 g icing sugar (powdered sugar)
300 ml double cream (heavy cream)
Juice of 2 lemons
300 g fresh raspberries
150 ml double cream (for decoration)
2 tbsp icing sugar (for decoration)
Fresh raspberries (for decoration)
Lemon zest (for decoration)
Freeze-dried raspberries (for decoration)
Instructions
1. Blitz digestive biscuits in a food processor to a fine crumb, or crush them using a rolling pin.
2. Add melted butter to the biscuit crumbs and mix until fully combined.
3. Press the mixture firmly into the base of a 20cm/8-inch deep springform tin and set aside.
4. Whisk cream cheese and icing sugar together in a mixing bowl using an electric mixer until smooth.
5. Add double cream and whisk again until the mixture starts to thicken.
6. Add lemon juice and continue whisking until the filling is very thick and holds its shape.
7. Gently fold in the fresh raspberries.
8. Spread the filling over the biscuit base and refrigerate for 5-6 hours or overnight.
9. Whisk double cream and icing sugar for decoration until stiff peaks form.
10. Pipe whipped cream swirls on top of the set cheesecake.
11. Decorate with fresh raspberries, lemon zest, and freeze-dried raspberries.
Notes
Use full-fat cream cheese only for best results.
Freshly squeezed lemon juice is strongly recommended over bottled.
Chill overnight for the firmest, cleanest slices.
Substitute digestive biscuits with graham crackers for a US-friendly version.
Store covered in the refrigerator for up to 3 days.
Freeze individual slices for up to 1 month – decorate after thawing.