Description
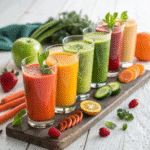
Refresh your body and mind with these three energizing juice recipes! Packed with vitamins, antioxidants, and natural flavor, each juice is designed to give you a healthy boost and keep you feeling vibrant all day long.
Ingredients
Green Vitality Juice
- 1/2 bunch kale (approximately 4-5 large leaves), thoroughly washed
- 2 large celery stalks, ends trimmed
- 1 large cucumber, washed
- 1/2 cup fresh pineapple chunks
- 1/4 cup fresh parsley, stems included
- 1/2 inch piece of fresh ginger, peeled
- 1/4 peeled lemon
Substitutions: Spinach or collard greens can replace kale; zucchini works well instead of cucumber; apple can substitute for pineapple if you prefer less sweetness; cilantro or basil can replace parsley for different flavor profiles.
Root Rejuvenator
- 1 medium beet, washed and trimmed
- 1 apple (any variety), washed and cored
- 1/2 inch piece of fresh ginger, peeled
- 1/4 peeled lemon
Substitutions: Red cabbage can replace beet for a milder flavor; pear works as an alternative to apple; turmeric root can be used alongside or instead of ginger for additional anti-inflammatory properties.
Sunrise Energizer
- 4 medium carrots, washed and trimmed
- 1 small orange, peeled
- 1/2 inch piece of fresh turmeric, peeled
- 1/2 inch piece of fresh ginger, peeled
- 1/4 peeled lemon
- Pinch of black pepper (enhances turmeric absorption)
Substitutions: Sweet potato or butternut squash can replace carrots; tangerine or grapefruit works instead of orange; ground turmeric (1/2 teaspoon) can substitute for fresh.
Instructions
1. Wash All Produce Thoroughly
Start by washing all fruits and vegetables under cold running water. Use a vegetable brush for firm produce like carrots, beets, and apples to remove any soil or residue. For leafy greens like kale and spinach, soak briefly in cold water then rinse thoroughly to remove any hidden dirt or sand.
2. Prep Your Ingredients
Cut all produce to fit the feed chute of your specific juicer. Remove any inedible parts:
- Core apples (if required by your juicer model)
- Trim ends from carrots, beets, and celery
- Peel citrus fruits if your juicer manual recommends it (some juicers can handle thin-skinned citrus with the peel on)
- Remove large pits from fruits like peaches or mangoes
Visual Indicator: Your prepped ingredients should be clean, appropriately sized, and free from any spoiled sections.
3. Organize Your Ingredients
Arrange your prepped ingredients in the order you’ll juice them. For optimal results:
- Start with leafy greens and herbs
- Follow with high-water content produce (cucumber, celery)
- End with firmer, juicier items (apples, carrots, beets)
This sequence helps push the maximum juice from leafy greens through the machine.
4. Prepare Your Juicer
Assemble your juicer according to the manufacturer’s instructions. Ensure all parts are properly locked in place. Position a juice pitcher under the spout and have the pulp container ready.
Success Marker: Your juicer should be completely assembled with no loose parts and positioned on a stable surface with the juice container properly aligned.
5. Begin Juicing Process
Turn on your juicer and start feeding ingredients one by one into the feed chute. Use the food pusher to gently guide produce—never force ingredients through with your fingers.
For leafy greens, roll them tightly into a compact bundle before inserting. This increases juice yield significantly.
6. Maintain Steady Pace
Feed ingredients at a consistent, unhurried pace. Rushing can reduce juice yield and potentially strain your machine. Allow each ingredient to process completely before adding the next.
Visual Indicator: You should see juice flowing steadily from the spout and pulp accumulating in the pulp container.
7. Monitor Juice Production
Watch for changes in juice flow. If it slows dramatically, you may need to reduce your feeding pace or clean the filter basket if it becomes clogged.
Success Marker: The juice should have a vibrant color corresponding to your ingredients, with a smooth consistency.
8. Complete the Juicing Cycle
After all ingredients have been processed, let the juicer run for an additional 20-30 seconds to extract any remaining juice from the pulp chamber.
9. Serve Immediately
Pour the fresh juice into glasses and serve right away for maximum nutritional benefit. If not consuming immediately, transfer to an airtight glass container, filling it to the very top to minimize air exposure.
Success Marker: Your finished juice should have a bright, fresh aroma and vibrant color with minimal separation.
Notes
For optimal nutrition and flavor, use organic produce whenever possible. Choose firm, brightly colored vegetables and fruits without blemishes or soft spots. Fresh ginger and turmeric should be firm and aromatic.
- Prep Time: PT10M
- Cook Time: PT0M
- Category: Drinks
- Method: Juiced
- Cuisine: International
