Description
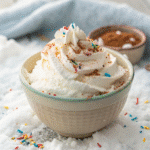
Enjoy a magical winter treat with this easy snow cream recipe! Made with just two ingredients, it’s creamy, sweet, and perfect for kids and adults alike. Make the most of fresh, clean snow for a fun and delicious homemade dessert.
Ingredients
- 8-12 cups of fresh, clean snow (amount varies based on snow density)
- 1 can (14 oz) sweetened condensed milk OR
- 1 cup whole milk or half-and-half plus 1/2 cup granulated sugar
- 1 teaspoon pure vanilla extract1 pinch of salt (to enhance flavors)
Instructions
- Prepare your liquid base. In a medium bowl, whisk together 1 cup of milk (whole milk works best), 1/3 cup granulated sugar, 1 teaspoon pure vanilla extract, and a tiny pinch of salt until the sugar completely dissolves. Alternatively, you can use a can of sweetened condensed milk (14 oz) with vanilla extract and skip the sugar entirely.
- Gather your snow collection equipment. Take a large bowl (at least 4 quarts capacity) and a clean ladle or large spoon outside. Look for an area with pristine, untouched snow away from trees, buildings, and areas with foot or vehicle traffic.
- Collect the snow. Fill your bowl with approximately 8-10 cups of fresh, clean snow. The snow should be bright white and fluffy. Heap it up in the bowl, as it will compress when mixed with the liquid ingredients.
- Bring the snow indoors immediately. Work quickly to prevent excessive melting. The colder your snow remains, the better texture your final snow cream will have.
- Begin the mixing process. Pour about half of your prepared liquid mixture over the snow. Using a wooden spoon or silicone spatula, gently fold the liquid into the snow with broad, sweeping motions rather than vigorous stirring.
- Assess the consistency. After incorporating half the liquid, evaluate the texture. It should be similar to soft-serve ice cream—scoopable but not runny. If it seems too dry or firm, add more of the liquid mixture. If it’s too wet, add more snow.
- Continue adding liquid gradually. Add the remaining liquid mixture in small amounts, folding gently after each addition until you achieve the perfect consistency. You may not need all the liquid, depending on the density and moisture content of your snow.
- Perform the spoon test. Your snow cream is ready when a spoon pulled through the mixture leaves a clean path that holds its shape for a few seconds before slowly filling in. The mixture should hold soft peaks when lifted with a spoon.
- Taste and adjust. Sample a small spoonful and adjust if needed. For more sweetness, sprinkle in a little extra sugar. For more richness, add a splash of additional vanilla.
- Transfer to serving bowls immediately. Snow cream begins melting quickly, so serve right away in chilled bowls for the best experience. The texture should be light and fluffy, melting gently on the tongue with each bite.
Notes
For best results, use freshly fallen snow. You can also use evaporated milk and sugar as a substitute for sweetened condensed milk. Enjoy immediately, as snow cream melts quickly!
- Prep Time: PT5M
- Cook Time: PT0M
- Category: Dessert
- Method: No Cook
- Cuisine: American
